# Welcome to Soulslike Framework!

<figure><img src="/files/Kr7yDegq8sJb3NzHlbU7" alt=""><figcaption></figcaption></figure>

Welcome to the official documentation for Soulslike Framework. This framework is crafted to help you build a Soulslike experience in Unreal Engine using Blueprint-friendly, industry-standard systems. Whether you're an indie developer or part of a larger team, this guide will provide all the information you need to get started.

### Lets get started:

<table data-view="cards"><thead><tr><th></th><th></th><th data-hidden data-card-cover data-type="files"></th><th data-hidden></th><th data-hidden data-card-target data-type="content-ref"></th></tr></thead><tbody><tr><td><strong>Framework Overview</strong></td><td>Discover the features of Soulslike Framework and see how it can enhance your development process.</td><td></td><td></td><td><a href="/pages/0xIZCouqebF8U1kZKVbS">/pages/0xIZCouqebF8U1kZKVbS</a></td></tr><tr><td><strong>Getting Started</strong></td><td>Set up your first Soulslike project in Unreal Engine with step-by-step instructions.</td><td></td><td></td><td><a href="/pages/Do2sAWijRxVeyPpJHwTN">/pages/Do2sAWijRxVeyPpJHwTN</a></td></tr><tr><td><strong>Core Systems</strong></td><td>Explore the core systems offered by Soulslike Framework</td><td></td><td></td><td><a href="/pages/7aUFmnCMx9m4smGncsXL">/pages/7aUFmnCMx9m4smGncsXL</a></td></tr><tr><td><strong>Utility Tools</strong></td><td>Utilize powerful tools such as the <strong>Item Creator</strong> and <strong>Action Creator</strong> provided by Soulslike Framework to simplify and accelerate your development process.</td><td></td><td></td><td><a href="/pages/CyH2xJQs9yWJ1S8BYNav">/pages/CyH2xJQs9yWJ1S8BYNav</a></td></tr><tr><td><strong>Customization</strong></td><td>Learn how to extend and modify the Soulslike Framework to align perfectly with your game’s specific needs.</td><td></td><td></td><td><a href="/pages/cmpzd9IRoyhXfbSZoXpG">/pages/cmpzd9IRoyhXfbSZoXpG</a></td></tr></tbody></table>


# RigVM Packaging Issue Related to Struct Conflicts

Date of publication: 23 July 2026

Earlier Soulslike Framework releases contained Structs with names such as `FVector`, `FString`, and `FName`.

These names conflicted with Unreal Engine's native C++ types. When Unreal recompiles a Blueprint or Control Rig, it may resolve a reference to the wrong type. This can cause broken pins, changed variable types, Control Rig compilation errors, or damaged references.

The SLF structs have now been renamed with a unique prefix:

* `FVector` → `ST_SLF_Vector`
* `FString` → `ST_SLF_String`
* `FName` → `ST_SLF_Name`

The corrected versions [have now been published on Fab.](https://www.fab.com/listings/75455ba4-7407-45db-b24e-160712b9586c)

## Existing Projects

Existing projects do not need to be restarted, and replacing the framework content is not required.&#x20;

You can try to manually rename the structs, however using the script below is recommended:

{% code overflow="wrap" lineNumbers="true" expandable="true" %}

```py
"""One-time Unreal Editor migration for Soulslike Framework struct assets.

Run with UnrealEditor-Cmd and PythonScriptPlugin. The script renames every
UserDefinedStruct below /Game/SoulslikeFramework/Structures from F<Name> to
ST_SLF_<Name>. Unreal's asset rename manager updates project references.
PackageRedirects included with the corrected framework release provide an
additional compatibility bridge.
"""

import traceback
import unreal


STRUCT_ROOT = "/Game/SoulslikeFramework/Structures"
NEW_PREFIX = "ST_SLF_"


def log(message):
    unreal.log("SLF_STRUCT_MIGRATION: " + message)


def fail(message):
    unreal.log_error("SLF_STRUCT_MIGRATION: " + message)
    raise RuntimeError(message)


def migrated_name(old_name):
    if old_name.startswith(NEW_PREFIX):
        return old_name
    stem = old_name[1:] if old_name.startswith("F") and len(old_name) > 1 else old_name
    return NEW_PREFIX + stem


def main():
    asset_library = unreal.EditorAssetLibrary
    asset_tools = unreal.AssetToolsHelpers.get_asset_tools()
    asset_paths = asset_library.list_assets(STRUCT_ROOT, recursive=True, include_folder=False)
    rename_data = []

    for asset_path in sorted(asset_paths):
        asset = asset_library.load_asset(asset_path)
        if not asset or asset.get_class().get_name() != "UserDefinedStruct":
            continue

        old_name = asset.get_name()
        new_name = migrated_name(old_name)
        if new_name == old_name:
            continue

        package_path = asset_path.rsplit("/", 1)[0]
        new_asset_path = package_path + "/" + new_name
        if asset_library.does_asset_exist(new_asset_path):
            fail("Destination already exists: " + new_asset_path)

        rename_data.append(unreal.AssetRenameData(asset, package_path, new_name))
        log("planned {} -> {}".format(asset_path, new_asset_path))

    if not rename_data:
        log("No assets require migration; names are already namespaced.")
        return

    log("Renaming {} UserDefinedStruct assets".format(len(rename_data)))
    if not asset_tools.rename_assets(rename_data):
        fail("AssetTools.rename_assets reported failure")

    # Save dirty customer packages as well as framework packages. This matters
    # when the framework was migrated into a real game whose Blueprints live
    # outside /Game/SoulslikeFramework.
    if not asset_library.save_directory("/Game", only_if_is_dirty=True, recursive=True):
        fail("One or more migrated project packages failed to save")

    new_assets_missing = []
    for item in rename_data:
        # The in-memory object path is already new, so derive the expected path
        # from the destination properties and verify the loaded object type.
        expected = item.new_package_path + "/" + item.new_name
        migrated = asset_library.load_asset(expected)
        if not migrated or migrated.get_class().get_name() != "UserDefinedStruct":
            new_assets_missing.append(expected)

    if new_assets_missing:
        fail("Migrated structs missing after save: " + ", ".join(new_assets_missing))

    log("SUCCESS: renamed and saved {} structs".format(len(rename_data)))


try:
    main()
except Exception:
    unreal.log_error("SLF_STRUCT_MIGRATION: UNHANDLED FAILURE\n" + traceback.format_exc())
    raise
    
```

{% endcode %}

The script aims to fix the project in place by:

* Renaming the conflicting SLF structs.
* Updating references in SLF assets.
* Updating references in project-specific Blueprints and assets.
* Saving the migrated assets.

#### Before Running the Script

1. Create a complete backup or source-control branch.&#x20;
2. Make sure the old SLF structs are still present.&#x20;
3. Close Unreal Editor.&#x20;
4. Create the script file: `rename_structs.py.`

#### Running the Script

Run the script using the same Unreal Engine version as your project.

Example for Windows, SLF on 5.7:

{% code overflow="wrap" lineNumbers="true" expandable="true" %}

```bat
"C:\Program Files\Epic Games\UE_5.7\Engine\Binaries\Win64\UnrealEditor-Cmd.exe" "D:\Projects\MyProject\MyProject.uproject" -ExecutePythonScript="D:\Scripts\rename_structs.py" -EnablePlugins=PythonScriptPlugin -unattended -nop4
```

{% endcode %}

{% hint style="warning" %}
Replace the **engine**, **project**, and **script paths** with your own paths.
{% endhint %}

Wait for the process to finish and confirm that the output contains:&#x20;

**`SLF_STRUCT_MIGRATION: SUCCESS`**

Do not continue if the script reports migration or save failures.

#### After Running the Script

1. Open the project.
2. Refresh, compile, and save affected Blueprints.
3. Refresh, compile, and save affected Animation Blueprints.
4. Open affected Control Rigs and select File → Refresh All Nodes.
5. Compile and save each Control Rig.
6. Test the affected gameplay systems.
7. Cook or package the project to confirm that no compilation errors remain.

Optionally, in your `DefaultEngine.ini` add the following under `[CoreRedirects]`

{% code overflow="wrap" lineNumbers="true" expandable="true" %}

```
[CoreRedirects]
; Compatibility for projects upgrading from pre-5.8 Soulslike Framework releases.
; Full paths avoid global name matching and do not reintroduce native-type collisions.
+PackageRedirects=(OldName="/Game/SoulslikeFramework/Structures/_Misc/FActorClass",NewName="/Game/SoulslikeFramework/Structures/_Misc/ST_SLF_ActorClass")
+PackageRedirects=(OldName="/Game/SoulslikeFramework/Structures/_Misc/FBool",NewName="/Game/SoulslikeFramework/Structures/_Misc/ST_SLF_Bool")
+PackageRedirects=(OldName="/Game/SoulslikeFramework/Structures/_Misc/FClass",NewName="/Game/SoulslikeFramework/Structures/_Misc/ST_SLF_Class")
+PackageRedirects=(OldName="/Game/SoulslikeFramework/Structures/_Misc/FDayNightInfo",NewName="/Game/SoulslikeFramework/Structures/_Misc/ST_SLF_DayNightInfo")
+PackageRedirects=(OldName="/Game/SoulslikeFramework/Structures/_Misc/FDoorLockInfo",NewName="/Game/SoulslikeFramework/Structures/_Misc/ST_SLF_DoorLockInfo")
+PackageRedirects=(OldName="/Game/SoulslikeFramework/Structures/_Misc/FEnumByte",NewName="/Game/SoulslikeFramework/Structures/_Misc/ST_SLF_EnumByte")
+PackageRedirects=(OldName="/Game/SoulslikeFramework/Structures/_Misc/FExecutionType",NewName="/Game/SoulslikeFramework/Structures/_Misc/ST_SLF_ExecutionType")
+PackageRedirects=(OldName="/Game/SoulslikeFramework/Structures/_Misc/FFloat",NewName="/Game/SoulslikeFramework/Structures/_Misc/ST_SLF_Float")
+PackageRedirects=(OldName="/Game/SoulslikeFramework/Structures/_Misc/FGuid",NewName="/Game/SoulslikeFramework/Structures/_Misc/ST_SLF_Guid")
+PackageRedirects=(OldName="/Game/SoulslikeFramework/Structures/_Misc/FInt",NewName="/Game/SoulslikeFramework/Structures/_Misc/ST_SLF_Int")
+PackageRedirects=(OldName="/Game/SoulslikeFramework/Structures/_Misc/FKeyMappingCorrelation",NewName="/Game/SoulslikeFramework/Structures/_Misc/ST_SLF_KeyMappingCorrelation")
+PackageRedirects=(OldName="/Game/SoulslikeFramework/Structures/_Misc/FLoadingScreenTip",NewName="/Game/SoulslikeFramework/Structures/_Misc/ST_SLF_LoadingScreenTip")
+PackageRedirects=(OldName="/Game/SoulslikeFramework/Structures/_Misc/FLootItem",NewName="/Game/SoulslikeFramework/Structures/_Misc/ST_SLF_LootItem")
+PackageRedirects=(OldName="/Game/SoulslikeFramework/Structures/_Misc/FName",NewName="/Game/SoulslikeFramework/Structures/_Misc/ST_SLF_Name")
+PackageRedirects=(OldName="/Game/SoulslikeFramework/Structures/_Misc/FObject",NewName="/Game/SoulslikeFramework/Structures/_Misc/ST_SLF_Object")
+PackageRedirects=(OldName="/Game/SoulslikeFramework/Structures/_Misc/FProgress",NewName="/Game/SoulslikeFramework/Structures/_Misc/ST_SLF_Progress")
+PackageRedirects=(OldName="/Game/SoulslikeFramework/Structures/_Misc/FRequiredCurrencyForLevel",NewName="/Game/SoulslikeFramework/Structures/_Misc/ST_SLF_RequiredCurrencyForLevel")
+PackageRedirects=(OldName="/Game/SoulslikeFramework/Structures/_Misc/FRotator",NewName="/Game/SoulslikeFramework/Structures/_Misc/ST_SLF_Rotator")
+PackageRedirects=(OldName="/Game/SoulslikeFramework/Structures/_Misc/FSkeletalMeshData",NewName="/Game/SoulslikeFramework/Structures/_Misc/ST_SLF_SkeletalMeshData")
+PackageRedirects=(OldName="/Game/SoulslikeFramework/Structures/_Misc/FString",NewName="/Game/SoulslikeFramework/Structures/_Misc/ST_SLF_String")
+PackageRedirects=(OldName="/Game/SoulslikeFramework/Structures/_Misc/FVector",NewName="/Game/SoulslikeFramework/Structures/_Misc/ST_SLF_Vector")
+PackageRedirects=(OldName="/Game/SoulslikeFramework/Structures/_Misc/FWeightedLoot",NewName="/Game/SoulslikeFramework/Structures/_Misc/ST_SLF_WeightedLoot")
+PackageRedirects=(OldName="/Game/SoulslikeFramework/Structures/Actions/FActionsData",NewName="/Game/SoulslikeFramework/Structures/Actions/ST_SLF_ActionsData")
+PackageRedirects=(OldName="/Game/SoulslikeFramework/Structures/AI/Rules/FAiRuleDistance",NewName="/Game/SoulslikeFramework/Structures/AI/Rules/ST_SLF_AiRuleDistance")
+PackageRedirects=(OldName="/Game/SoulslikeFramework/Structures/AI/Rules/FAiRuleStat",NewName="/Game/SoulslikeFramework/Structures/AI/Rules/ST_SLF_AiRuleStat")
+PackageRedirects=(OldName="/Game/SoulslikeFramework/Structures/AI/FAiAttackEntry",NewName="/Game/SoulslikeFramework/Structures/AI/ST_SLF_AiAttackEntry")
+PackageRedirects=(OldName="/Game/SoulslikeFramework/Structures/AI/FAiBossPhase",NewName="/Game/SoulslikeFramework/Structures/AI/ST_SLF_AiBossPhase")
+PackageRedirects=(OldName="/Game/SoulslikeFramework/Structures/AI/FAiPatrolPathInfo",NewName="/Game/SoulslikeFramework/Structures/AI/ST_SLF_AiPatrolPathInfo")
+PackageRedirects=(OldName="/Game/SoulslikeFramework/Structures/AI/FAiSenseLocationInfo",NewName="/Game/SoulslikeFramework/Structures/AI/ST_SLF_AiSenseLocationInfo")
+PackageRedirects=(OldName="/Game/SoulslikeFramework/Structures/AI/FAiSenseTargetInfo",NewName="/Game/SoulslikeFramework/Structures/AI/ST_SLF_AiSenseTargetInfo")
+PackageRedirects=(OldName="/Game/SoulslikeFramework/Structures/AI/FAiStrafeInfo",NewName="/Game/SoulslikeFramework/Structures/AI/ST_SLF_AiStrafeInfo")
+PackageRedirects=(OldName="/Game/SoulslikeFramework/Structures/Animation/FAnimationData",NewName="/Game/SoulslikeFramework/Structures/Animation/ST_SLF_AnimationData")
+PackageRedirects=(OldName="/Game/SoulslikeFramework/Structures/Animation/FDodgeMontages",NewName="/Game/SoulslikeFramework/Structures/Animation/ST_SLF_DodgeMontages")
+PackageRedirects=(OldName="/Game/SoulslikeFramework/Structures/Animation/FExecutionAnimInfo",NewName="/Game/SoulslikeFramework/Structures/Animation/ST_SLF_ExecutionAnimInfo")
+PackageRedirects=(OldName="/Game/SoulslikeFramework/Structures/Animation/FExecutionInfo",NewName="/Game/SoulslikeFramework/Structures/Animation/ST_SLF_ExecutionInfo")
+PackageRedirects=(OldName="/Game/SoulslikeFramework/Structures/Animation/FMontage",NewName="/Game/SoulslikeFramework/Structures/Animation/ST_SLF_Montage")
+PackageRedirects=(OldName="/Game/SoulslikeFramework/Structures/Compass/FCardinalData",NewName="/Game/SoulslikeFramework/Structures/Compass/ST_SLF_CardinalData")
+PackageRedirects=(OldName="/Game/SoulslikeFramework/Structures/Credits/FCreditsEntry",NewName="/Game/SoulslikeFramework/Structures/Credits/ST_SLF_CreditsEntry")
+PackageRedirects=(OldName="/Game/SoulslikeFramework/Structures/Credits/FCreditsExtra",NewName="/Game/SoulslikeFramework/Structures/Credits/ST_SLF_CreditsExtra")
+PackageRedirects=(OldName="/Game/SoulslikeFramework/Structures/Credits/FCreditsNames",NewName="/Game/SoulslikeFramework/Structures/Credits/ST_SLF_CreditsNames")
+PackageRedirects=(OldName="/Game/SoulslikeFramework/Structures/Dialog/FDialogEntry",NewName="/Game/SoulslikeFramework/Structures/Dialog/ST_SLF_DialogEntry")
+PackageRedirects=(OldName="/Game/SoulslikeFramework/Structures/Dialog/FDialogGameplayEvent",NewName="/Game/SoulslikeFramework/Structures/Dialog/ST_SLF_DialogGameplayEvent")
+PackageRedirects=(OldName="/Game/SoulslikeFramework/Structures/Dialog/FDialogProgress",NewName="/Game/SoulslikeFramework/Structures/Dialog/ST_SLF_DialogProgress")
+PackageRedirects=(OldName="/Game/SoulslikeFramework/Structures/Dialog/FDialogRequirement",NewName="/Game/SoulslikeFramework/Structures/Dialog/ST_SLF_DialogRequirement")
+PackageRedirects=(OldName="/Game/SoulslikeFramework/Structures/Items/Equipment/FCurrentEquipment",NewName="/Game/SoulslikeFramework/Structures/Items/Equipment/ST_SLF_CurrentEquipment")
+PackageRedirects=(OldName="/Game/SoulslikeFramework/Structures/Items/Equipment/FEquipmentInfo",NewName="/Game/SoulslikeFramework/Structures/Items/Equipment/ST_SLF_EquipmentInfo")
+PackageRedirects=(OldName="/Game/SoulslikeFramework/Structures/Items/Equipment/FEquipmentSlot",NewName="/Game/SoulslikeFramework/Structures/Items/Equipment/ST_SLF_EquipmentSlot")
+PackageRedirects=(OldName="/Game/SoulslikeFramework/Structures/Items/Equipment/FEquipmentSocketInfo",NewName="/Game/SoulslikeFramework/Structures/Items/Equipment/ST_SLF_EquipmentSocketInfo")
+PackageRedirects=(OldName="/Game/SoulslikeFramework/Structures/Items/Equipment/FEquipmentStat",NewName="/Game/SoulslikeFramework/Structures/Items/Equipment/ST_SLF_EquipmentStat")
+PackageRedirects=(OldName="/Game/SoulslikeFramework/Structures/Items/Equipment/FEquipmentWeaponStatInfo",NewName="/Game/SoulslikeFramework/Structures/Items/Equipment/ST_SLF_EquipmentWeaponStatInfo")
+PackageRedirects=(OldName="/Game/SoulslikeFramework/Structures/Items/FCraftingInfo",NewName="/Game/SoulslikeFramework/Structures/Items/ST_SLF_CraftingInfo")
+PackageRedirects=(OldName="/Game/SoulslikeFramework/Structures/Items/FFlaskData",NewName="/Game/SoulslikeFramework/Structures/Items/ST_SLF_FlaskData")
+PackageRedirects=(OldName="/Game/SoulslikeFramework/Structures/Items/FInventoryCategory",NewName="/Game/SoulslikeFramework/Structures/Items/ST_SLF_InventoryCategory")
+PackageRedirects=(OldName="/Game/SoulslikeFramework/Structures/Items/FItemCategory",NewName="/Game/SoulslikeFramework/Structures/Items/ST_SLF_ItemCategory")
+PackageRedirects=(OldName="/Game/SoulslikeFramework/Structures/Items/FItemInfo",NewName="/Game/SoulslikeFramework/Structures/Items/ST_SLF_ItemInfo")
+PackageRedirects=(OldName="/Game/SoulslikeFramework/Structures/Items/FItemInfoCount",NewName="/Game/SoulslikeFramework/Structures/Items/ST_SLF_ItemInfoCount")
+PackageRedirects=(OldName="/Game/SoulslikeFramework/Structures/Items/FWeaponAttackPower",NewName="/Game/SoulslikeFramework/Structures/Items/ST_SLF_WeaponAttackPower")
+PackageRedirects=(OldName="/Game/SoulslikeFramework/Structures/Items/FWorldMeshInfo",NewName="/Game/SoulslikeFramework/Structures/Items/ST_SLF_WorldMeshInfo")
+PackageRedirects=(OldName="/Game/SoulslikeFramework/Structures/ItemWheel/FItemWheelNextSlotInfo",NewName="/Game/SoulslikeFramework/Structures/ItemWheel/ST_SLF_ItemWheelNextSlotInfo")
+PackageRedirects=(OldName="/Game/SoulslikeFramework/Structures/Saving/FClassSaveInfo",NewName="/Game/SoulslikeFramework/Structures/Saving/ST_SLF_ClassSaveInfo")
+PackageRedirects=(OldName="/Game/SoulslikeFramework/Structures/Saving/FEquipmentItemsSaveInfo",NewName="/Game/SoulslikeFramework/Structures/Saving/ST_SLF_EquipmentItemsSaveInfo")
+PackageRedirects=(OldName="/Game/SoulslikeFramework/Structures/Saving/FInteractableStateSaveInfo",NewName="/Game/SoulslikeFramework/Structures/Saving/ST_SLF_InteractableStateSaveInfo")
+PackageRedirects=(OldName="/Game/SoulslikeFramework/Structures/Saving/FInventoryItemsSaveInfo",NewName="/Game/SoulslikeFramework/Structures/Saving/ST_SLF_InventoryItemsSaveInfo")
+PackageRedirects=(OldName="/Game/SoulslikeFramework/Structures/Saving/FItemWheelSaveInfo",NewName="/Game/SoulslikeFramework/Structures/Saving/ST_SLF_ItemWheelSaveInfo")
+PackageRedirects=(OldName="/Game/SoulslikeFramework/Structures/Saving/FNpcSaveInfo",NewName="/Game/SoulslikeFramework/Structures/Saving/ST_SLF_NpcSaveInfo")
+PackageRedirects=(OldName="/Game/SoulslikeFramework/Structures/Saving/FNpcVendorSaveInfo",NewName="/Game/SoulslikeFramework/Structures/Saving/ST_SLF_NpcVendorSaveInfo")
+PackageRedirects=(OldName="/Game/SoulslikeFramework/Structures/Saving/FProgressSaveInfo",NewName="/Game/SoulslikeFramework/Structures/Saving/ST_SLF_ProgressSaveInfo")
+PackageRedirects=(OldName="/Game/SoulslikeFramework/Structures/Saving/FSaveData",NewName="/Game/SoulslikeFramework/Structures/Saving/ST_SLF_SaveData")
+PackageRedirects=(OldName="/Game/SoulslikeFramework/Structures/Saving/FSaveGameInfo",NewName="/Game/SoulslikeFramework/Structures/Saving/ST_SLF_SaveGameInfo")
+PackageRedirects=(OldName="/Game/SoulslikeFramework/Structures/Saving/FSpawnedActorSaveInfo",NewName="/Game/SoulslikeFramework/Structures/Saving/ST_SLF_SpawnedActorSaveInfo")
+PackageRedirects=(OldName="/Game/SoulslikeFramework/Structures/Saving/FWorldSaveInfo",NewName="/Game/SoulslikeFramework/Structures/Saving/ST_SLF_WorldSaveInfo")
+PackageRedirects=(OldName="/Game/SoulslikeFramework/Structures/Stats/FAffectedStat",NewName="/Game/SoulslikeFramework/Structures/Stats/ST_SLF_AffectedStat")
+PackageRedirects=(OldName="/Game/SoulslikeFramework/Structures/Stats/FAffectedStats",NewName="/Game/SoulslikeFramework/Structures/Stats/ST_SLF_AffectedStats")
+PackageRedirects=(OldName="/Game/SoulslikeFramework/Structures/Stats/FLevelChangeData",NewName="/Game/SoulslikeFramework/Structures/Stats/ST_SLF_LevelChangeData")
+PackageRedirects=(OldName="/Game/SoulslikeFramework/Structures/Stats/FRegen",NewName="/Game/SoulslikeFramework/Structures/Stats/ST_SLF_Regen")
+PackageRedirects=(OldName="/Game/SoulslikeFramework/Structures/Stats/FSprintCost",NewName="/Game/SoulslikeFramework/Structures/Stats/ST_SLF_SprintCost")
+PackageRedirects=(OldName="/Game/SoulslikeFramework/Structures/Stats/FStatBehavior",NewName="/Game/SoulslikeFramework/Structures/Stats/ST_SLF_StatBehavior")
+PackageRedirects=(OldName="/Game/SoulslikeFramework/Structures/Stats/FStatChange",NewName="/Game/SoulslikeFramework/Structures/Stats/ST_SLF_StatChange")
+PackageRedirects=(OldName="/Game/SoulslikeFramework/Structures/Stats/FStatChangePercent",NewName="/Game/SoulslikeFramework/Structures/Stats/ST_SLF_StatChangePercent")
+PackageRedirects=(OldName="/Game/SoulslikeFramework/Structures/Stats/FStatEntry",NewName="/Game/SoulslikeFramework/Structures/Stats/ST_SLF_StatEntry")
+PackageRedirects=(OldName="/Game/SoulslikeFramework/Structures/Stats/FStatInfo",NewName="/Game/SoulslikeFramework/Structures/Stats/ST_SLF_StatInfo")
+PackageRedirects=(OldName="/Game/SoulslikeFramework/Structures/Stats/FStatOverride",NewName="/Game/SoulslikeFramework/Structures/Stats/ST_SLF_StatOverride")
+PackageRedirects=(OldName="/Game/SoulslikeFramework/Structures/StatusEffects/FStatusEffectApplication",NewName="/Game/SoulslikeFramework/Structures/StatusEffects/ST_SLF_StatusEffectApplication")
+PackageRedirects=(OldName="/Game/SoulslikeFramework/Structures/StatusEffects/FStatusEffectFrostbiteExample",NewName="/Game/SoulslikeFramework/Structures/StatusEffects/ST_SLF_StatusEffectFrostbiteExample")
+PackageRedirects=(OldName="/Game/SoulslikeFramework/Structures/StatusEffects/FStatusEffectOneShotAndTick",NewName="/Game/SoulslikeFramework/Structures/StatusEffects/ST_SLF_StatusEffectOneShotAndTick")
+PackageRedirects=(OldName="/Game/SoulslikeFramework/Structures/StatusEffects/FStatusEffectPlagueExample",NewName="/Game/SoulslikeFramework/Structures/StatusEffects/ST_SLF_StatusEffectPlagueExample")
+PackageRedirects=(OldName="/Game/SoulslikeFramework/Structures/StatusEffects/FStatusEffectRankInfo",NewName="/Game/SoulslikeFramework/Structures/StatusEffects/ST_SLF_StatusEffectRankInfo")
+PackageRedirects=(OldName="/Game/SoulslikeFramework/Structures/StatusEffects/FStatusEffectStatChanges",NewName="/Game/SoulslikeFramework/Structures/StatusEffects/ST_SLF_StatusEffectStatChanges")
+PackageRedirects=(OldName="/Game/SoulslikeFramework/Structures/StatusEffects/FStatusEffectTick",NewName="/Game/SoulslikeFramework/Structures/StatusEffects/ST_SLF_StatusEffectTick")
+PackageRedirects=(OldName="/Game/SoulslikeFramework/Structures/StatusEffects/FStatusEffectVfxInfo",NewName="/Game/SoulslikeFramework/Structures/StatusEffects/ST_SLF_StatusEffectVfxInfo")
+PackageRedirects=(OldName="/Game/SoulslikeFramework/Structures/Vendor/FVendorItems",NewName="/Game/SoulslikeFramework/Structures/Vendor/ST_SLF_VendorItems")
```

{% endcode %}

## Important Warnings

* Always back up the project before migration.
* Run the script while the original SLF structs are still present.
* Do not add **StructRedirects** for names such as FVector, FName, or FString. These names overlap with native Unreal types and can create additional RigVM conflicts.
* Do not overwrite customized SLF assets without reviewing the changes.
* Keep your backup until the project compiles and cooks successfully.

Discord Support

{% embed url="<https://discord.gg/zHR7wKgEFA>" %}


# About the Framework

### **What is Soulslike Framework?**

Soulslike Framework is a Blueprint-based framework for Unreal Engine, specifically designed to simplify the creation of games inspired by Soulslike mechanics. Its modular, data-driven, and event-driven architecture provides maximum flexibility, making it easy to integrate and customize. Whether you're a beginner or an experienced developer, Soulslike Framework offers a user-friendly foundation to bring your unique game vision to life.

### **Why Soulslike Framework?**

Soulslike Framework offers several distinct advantages over other solutions, especially for teams or individuals looking for scalability, ease of use, and rapid prototyping:

* **Blueprint-First**: Unlike most C++ assets, Soulslike Framework is entirely built in Blueprints. This means:
  * It’s beginner-friendly.
  * You can tweak, prototype, and test mechanics in real-time without recompiling code.
* **Modular & Data-Driven**: Everything is powered by Gameplay Tags and Data Assets. You can:
  * Swap out components without breaking other systems.
  * Add custom mechanics easily.
* **Utility-Focused**: It includes a lot of Utility tools that will be saving you hours of repetitive work.
* **High-End, Professional UI**: Inspired by Elden Ring, with clean, professional designs and animations. Built entirely with UMG.


# Features & Systems

### **Key Features:**

* Modular systems for combat, crafting, progression, and more.
* Tag-based architecture for efficient data management.
* Utility tools to speed up in-editor workflows.

### **All Provided Systems:**

* Item System
* Inventory System
* Equipment System (using Skeletal Merging plugin provided by Epic)
* Crafting System
* Loot Notifications System
* UObject Based Stat & Attribute System
* UObject Based Status Effect System
* UObject Based Action System
* UOBject Based Buff System
* Input Buffer System
* Additive Animation System
* Weapon Art/Ability System
* Weapon Specific Animsets
* Intuitive Combat System
* Guarding & Perfect Guarding System
* Slot Based Saving & Loading System
* Example Time of Day System
* Gameplay Tag Based Progression System
* NPC Dialog System (based on Progression)
* Vendor System
* Resting Point System
* Modular Ladder System
* Radar/Compass System
* Settings System
* AI Combat & Behavior System
* AI Ability System
* Advanced Boss AI

### **Provided Examples:**

* Lots of example level design actors tied to the current systems (Door system, Chest system etc)
* Example leveling up system
* Lots of notify states (Camera Shake, Interrupt, Weapon/Fist Trace, Input Buffer, ComboRegister, Trail and a lot more)
* Example character class system with different stats/attributes
* Example currency system
* Multiple examples for items, stats, status effects, buffs, actions.

### **Utility Tools:**

* Easy Setup Tool
* Item Creator
* Item Browser
* Action Creator
* Action Browser
* Status Effect Creator
* Status Effect Browser
* Weapon Ability Creator
* Weapon Ability Browser
* Weapon Animset Creator
* Weapon Animset Browser
* AI Ability Creator
* Enemy Inspector
* and more..


# Before Purchasing

### **Who should buy Soulslike Framework?**

* **Beginners who are willing to put in time and learn**:  A basic understanding of Blueprints, communication between them, inheritance, Enhanced Input, UMG (if you want to customize UI) and Gameplay Tags is required.&#x20;
  * Expect to invest at least **15-20** hours for learning.
* **Indie Teams**: Small teams can leverage the modularity and pre-built systems to save time and focus on content creation.
* **Experienced Developers**: Advanced users can use the framework as a base, extending functionality with C++ if needed.

{% hint style="info" %}
Support is available on Discord after checking the documentation and tutorials.
{% endhint %}


# Personal Assistance

Personal assistance for Soulslike Framework is provided through the **isikdev systems** Discord server.

The Discord server is open for everyone, however *requires a simple verification process* where you must provide your **Order ID** through direct message or email to access the Soulslike Framework channel.

### Discord Link

{% embed url="<https://discord.gg/zHR7wKgEFA>" %}

### How to find your Order ID

After purchasing any product from **Fab** you will receive an email with your receipt which contains your **Order ID:**

<figure><img src="/files/XjT3Aei9aeyqscnouWg0" alt=""><figcaption></figcaption></figure>


# Setting up Animations

In this section, we'll guide you through configuring **Soulslike Framework** to work seamlessly with your custom **animations**. Soulslike Framework includes a variety of sample animations sourced from Epic's public projects, such as the **Game Animation Sample** and **Paragon**, in addition to custom animations that we have specifically developed for this framework.&#x20;

{% hint style="warning" %}
Animations used in the Playable Demo will **NOT** be provided due to asset licensing restrictions. However, following this guide, you will learn how to easily use the system with animations that you own.
{% endhint %}


# Setup Locomotion Blendspaces

## Setting up a Blendspace

Soulslike Framework uses **Blendspaces** to create smooth transitions between different movement states. **Blendspaces** allow animations to dynamically respond to variables like speed or direction.

### Blendspace Examples

The framework includes two sample Blendspaces:

* **ABS\_SLF\_WalkRun**: Used for walking and running transitions.
* **ABS\_SLF\_Crouch**: Used for crouching movement.

As their names suggest, these Blendspaces are used to handle transitions for different locomotion states.

### Creating New Blendspaces

1. Right-click the **Content Browser** in an appropriate directory, select Animation -> Blend Space.

<div align="center"><figure><img src="/files/geAZaL0TLHgi1xv5CHzt" alt="" width="361"><figcaption></figcaption></figure></div>

2. If you are planning on using a custom character, select its Skeleton. If you are planning on using a character rigged to the Epic skeleton, select:

   1. **SK\_Mannequin** (for the **Unreal Engine 5** Manny/Quinn skeleton)
   2. **SK\_Mannequin\_Skeleton** (for the **Unreal Engine 4** Mannequin)

3. Setup **Axis Settings** & **Sample Smoothing** similarly (or to your liking):

<div align="center"><figure><img src="/files/SCBsw2Ex2aMt785fCzuy" alt="" width="193"><figcaption></figcaption></figure></div>

4. Setup your animations accordingly. If you are planning on having 8-directional movement, you can follow this format (yellow points are optional):

<figure><img src="/files/853ZsxCkT8QeAmDhU7DW" alt=""><figcaption></figcaption></figure>

Similarly, create a Blendspace for the Crouch state.&#x20;


# Setup Custom Montages

## Working with Animation Montages

Animation Montages are crucial in Soulslike Framework for handling actions like **attacks, dodging, weapon abilities & interactions.** They allow you to play animations dynamically while also triggering gameplay events using **Notify States**.

### What are Animation Notifies?

<figure><img src="/files/BnQDCFMwbwgmsDc1Sa4l" alt=""><figcaption></figcaption></figure>

Animation Notifies and Animation Notify States are powerful tools designed to synchronize animations with gameplay systems. They enable seamless integration with the framework’s core systems, such as combat & visual feedback.

Soulslike Framework comes equipped with various Animation Notifies & Animation Notify States for you to use out of the box.

### Creating New Dodging/Rolling Montages

Let's start simple. Locate your relevant multi-directional dodging/rolling animations.

{% hint style="warning" %}
Ensure that you are working with **Root Motion** animations.
{% endhint %}

1. Open up your Animation asset and ensure **"Enable Root Motion" is ticked** and that the root motion is working correctly.

<figure><img src="/files/n8NMwZdyXqAdow6UuOMe" alt=""><figcaption></figcaption></figure>

2. Right-click the relevant animation asset and select to **Create -> Create AnimMontage** to create your Animation Montage.

<figure><img src="/files/BinYnJD1AXy3Rc0fuMcn" alt="" width="238"><figcaption></figcaption></figure>

3. Open up the newly created Animation Montage asset. Now we must utilize one of your **Animation Notify States** to ensure that this montage is compatible with the Input Buffer. Right-click the ***Notifies Track*** and add new Notify State -> **ANS\_InputBuffer.** [\[Input Buffer Notify\]](/animation-notifies/miscellaneous/input-buffer-notify)

<figure><img src="/files/YCeibgUySt5wl6puXZyQ" alt=""><figcaption></figcaption></figure>

4. Adjust the start/end of the Notify State accordingly.

   1. **Start:** Input is queued in the **Input Buffer** to avoid interrupting the animation.
   2. **End: I**nput is enabled, allowing the player to seamlessly transition to the next action.

   <figure><img src="/files/P1TRFLb17pCBbi6a4k8P" alt=""><figcaption></figcaption></figure>
5. Add a new notify track and similarly add the **ANS\_InvincibilityFrame** Notify State. [\[Invincibility Frame Notify\]](/animation-notifies/defensive/invincibility-frame-notify)

   1. **Start:** Player will become invincible to all damaging attacks.
   2. **End:** Invincibility window finished, player can be damaged by attacks.

   <figure><img src="/files/dMa3nezB2QkdjK3TtqvS" alt=""><figcaption></figcaption></figure>
6. (Optional) Add a new notify track and add the **AN\_TryGuard** notify. This notify will check if player wants to "guard" at that specific time. [\[Check for Guard Notify\]](/animation-notifies/defensive/try-guard-notify)
7. (Optional) You can also add a new notify track and add the Unreal-provided **"Disable Root Motion"** Notify State to disable root motion temporarily. This Notify State is particularly useful when you want the player to have periodical freedom from Root Motion locking. You can check out some of the provided montages to see how we've utilized it.

<figure><img src="/files/2S3triUHO59aGniqhD4K" alt=""><figcaption></figcaption></figure>

Create rest of your dodging montages similarly.

***

### Creating New Attacks/Combo Montages

Soulslike Framework handles combo's through the **Montage Section** system provided by Unreal Engine. Luckily, it is very easy to work with. Lets see how we can create new combo's below.

In this example, we'll be creating a **Light attack combo** for a weapon with the **Light Sword animset**:

1. Create a montage from the **First** attack animation/sequence.
2. Drag and Drop rest of the sequences to the Montage Track:

<figure><img src="/files/dV3jeJjdtWKCE8pDnot4" alt=""><figcaption></figcaption></figure>

After you're done, your Montage Track should look like this:

<figure><img src="/files/bDBJg5HWJWEPQW2J9qlA" alt=""><figcaption></figcaption></figure>

3. Right click the **Montage Track (above the sequences)** and add **Montage Sections** at the start of each sequence.

   1. For a **light attack combo**, use the following naming for the sections&#x20;
      1. **"Light\_01" -> "Light\_02", etc.**
   2. For a **heavy attack combo**, use the following naming for the sections&#x20;
      1. **"Heavy\_01" -> "Heavy\_02" etc.**

   <figure><img src="/files/Np1qFlOpodMLVREHbcXA" alt=""><figcaption></figcaption></figure>

4. After you're done, ensure that all chains/links are cleared in the **Montage Sections** tab. If you do not have this tab, you can open it from **Window -> Montage Sections.**

<figure><img src="/files/ksGReNterSy40BRK9fjQ" alt=""><figcaption></figcaption></figure>

5. Now, the framework has complete control over this montage. However we will need to setup necessary **Anim Notifies** to get our new combo montage working. Head into the first **Notify Track** **(1)** and add a new **Notify State** **->** **ANS\_RegisterAttackSequence.** Add this Notify State to each section and ensure that the Queued Section is set correctly. [\[Register Attack Notify\]](/animation-notifies/damaging-and-combos/register-attack-notify)

<figure><img src="/files/LWdzyhMK3clWhCFmde5P" alt=""><figcaption></figcaption></figure>

6. Add a new **Notify Track** and add the **ANS\_InputBuffer** Notify State so that the montage can communicate with the Input Buffer component. This Anim Notify will enable/disable input detection. [\[Input Buffer Notify\]](/animation-notifies/miscellaneous/input-buffer-notify)

<figure><img src="/files/xAgqGsxPN0X0MGthIACH" alt=""><figcaption></figcaption></figure>

7. We can add another **Notify Track** and add the **Disable Root Motion** Notify State to allow player to move minimally at the start of the attacks. This will also allow the player to rotate quickly at the start of each section.

<figure><img src="/files/YqakEe7Ub9hWi8mq5cQg" alt=""><figcaption></figcaption></figure>

8. Lets add another **Notify Track** and add the Notify **AN\_InterruptMontage.** Place it somewhere before the blend-out stage of the attack sequence. You can tweak the **Blend Out Duration** to your liking per notify. This Notify allows the user to break out of the blend-out part of an attack animation. [\[Montage Break Notify\]](/animation-notifies/miscellaneous/interrupt-montage-notify)

<figure><img src="/files/0VlfdiWK2DRzPX8agdbh" alt=""><figcaption></figcaption></figure>

9. Add yet another **Notify Track** and add the Notify **AN\_TryGuard.** Place it somewhere **after the Input Buffer Notify State.** This notify will ensure that player can go back to the **Guarding** state if they're trying to guard (holding the guarding key). [\[Check for Guard Notify\]](/animation-notifies/defensive/try-guard-notify)
10. Finally, lets add our **Notify State** responsible for weapon tracing. Add another **Notify** **Track** and add the **ANS\_WeaponTrace** Notify State. Ensure that **TraceType** is set correctly relevant to your animation. [\[Weapon Trace Notify\]](/animation-notifies/damaging-and-combos/weapon-trace-notify)

<figure><img src="/files/uh0PQeuyms1Xbm8HnSh9" alt=""><figcaption></figcaption></figure>

10. That is it for the fundamental notifies. Rest is up to your liking! Here's an example on what notifies could be added furthermore:

<figure><img src="/files/wNdaNPi3tbIuZSuiErhY" alt=""><figcaption></figcaption></figure>

For more information about the provided notifies, you can check out [the Animation Notifies category.](/animation-notifies/damaging-and-combos)

Now, how do we utilize these new montages? [Read more on the Utility Tools page.](/getting-started/quickstart-1)


# Using the Utility Tools

If you've followed the [Setting up Animations](/getting-started/quickstart) category thoroughly, you should now have your own **Blendspaces & Montages.** But you might be wondering about *how to actually use them within the framework.*

Working with any type of framework can be a daunting task. To combat this, we've created various **Utility tools** to make usage of the framework simpler.

<table data-view="cards"><thead><tr><th></th><th></th><th></th><th data-hidden data-card-target data-type="content-ref"></th></tr></thead><tbody><tr><td><strong>Easy Setup Tool</strong></td><td>Easily setup necessary animations through this Utility tool.</td><td></td><td><a href="/pages/4C1ZYnPwXoSO8xJ01LS2">/pages/4C1ZYnPwXoSO8xJ01LS2</a></td></tr><tr><td><strong>Asset Creators</strong></td><td>Easily create necessary assets for your project through these Utility tools.</td><td></td><td><a href="/pages/mMNmpQuuXGBYufPYqPRy">/pages/mMNmpQuuXGBYufPYqPRy</a></td></tr><tr><td><strong>Asset Browsers</strong></td><td>Easily browse your custom assets in your project through these custom browser Utility tools.</td><td></td><td><a href="/pages/W63T1a0gGUIBG6m6CCT1">/pages/W63T1a0gGUIBG6m6CCT1</a></td></tr></tbody></table>


# Easy Setup Tool

Let's go over how you can utilize the **Setup Tool** to setup some necessary animations:

1. Click the Soulslike Framework editor button (or head Inside the \_Utility directory inside the main **SoulslikeFramework** folder) and run the **Setup Tool:**

<figure><img src="/files/wAbMnyxU5aDl2uz34W94" alt=""><figcaption></figcaption></figure>

3. Start the Checklist, and adjust any of the assets you want:

<figure><img src="/files/8aYLW52pZyx1td6ZsiP0" alt=""><figcaption></figcaption></figure>

<figure><img src="/files/NDCQVID9TtGQH2XDieC2" alt=""><figcaption></figcaption></figure>

{% hint style="success" %}
You can always re-run this tool and easily fill in the **most necessary** assets related to the framework.
{% endhint %}


# Asset Creators

Soulslike Framework provides Utility tools for easily creating assets. This means that you won't have to navigate around the project as much as you would without them!

<figure><img src="/files/cqxKyeLQOTO5igunkNe3" alt=""><figcaption></figcaption></figure>

### Item Creator

Used to streamline item creation. Simply Fill in all necessary item details and press **"Create Item"** to create your new item.

{% hint style="info" %}
By default, all item assets are created in **/Game/SoulslikeFramework/Data/\_Items/.** You can adjust this by navigating into the EUW\_ItemCreator and adjusting the **ItemsPath** property.
{% endhint %}

<figure><img src="/files/CKmbnWQQZyptzI8HUEXd" alt=""><figcaption></figcaption></figure>

### Weapon Animset Creator

Used to streamline Weapon Animset creation. Fill in all necessary animations/montages and press **"Create Moveset"** to create your new Animset.

{% hint style="info" %}
By default, all Weapon Animset assets are created in **/Game/SoulslikeFramework/Data/WeaponAnimsets/.** You can adjust this by navigating into the **EUW\_WeaponAnimsetCreator** and adjusting the **AnimsetPath** property.
{% endhint %}

<figure><img src="/files/ubWYJ0ZzCHr7RbPkxuMw" alt=""><figcaption></figcaption></figure>

### Weapon Ability Creator

Used to streamline Weapon Ability creation. Fill in all necessary data and press **"Create Ability"** to create your new Weapon Ability.

{% hint style="info" %}
By default, all weapon ability assets are created in **/Game/SoulslikeFramework/Data/WeaponAbilities/.** You can adjust this by navigating into the **EUW\_WeaponAbilityCreator** and adjusting the **WeaponAbilityPath** property.
{% endhint %}

<figure><img src="/files/xRJ3EejhsuOeQAInSX0c" alt=""><figcaption></figcaption></figure>

### Action Creator

Used to streamline Action creation. Fill in all necessary data and press **"Create Action"** to create your new Action asset & object.

{% hint style="info" %}
By default, all Actions are created in **/Game/SoulslikeFramework/Data/Actions/.** You can adjust this by navigating into the **EUW\_ActionCreator** and adjusting the **ActionDataPath & ActionLogicPath** properties.
{% endhint %}

<figure><img src="/files/PpXCVfpeDejiiIE7hfTm" alt=""><figcaption></figcaption></figure>

### Status Effect Creator

Used to streamline Status Effect creation. Fill in all necessary data and press **"Create Status Effect"** to create your new Status Effect asset & object.

{% hint style="info" %}
By default, all Status Effects are created in **/Game/SoulslikeFramework/Data/StatusEffects/.** You can adjust this by navigating into the **EUW\_StatusEffectCreator** and adjusting the **StatusEffectDataPath & StatusEffectLogicPath** properties.
{% endhint %}

<figure><img src="/files/GPj5L2boN5VqYyPtqevV" alt=""><figcaption></figcaption></figure>

### AI Ability Creator

Used to streamline AI Ability creation. Fill in all necessary ability data and press **"Create AI Ability"** to create your new AI Ability asset.

{% hint style="info" %}
By default, all AI Abilities are created in **/Game/SoulslikeFramework/Data/AI\_Abilities/.** You can adjust this by navigating into the **EUW\_AI\_AbilityCreator** and adjusting the **AiAbilityDataPath** property.
{% endhint %}

<figure><img src="/files/HyYE6JRp84VdPzWgcr6W" alt=""><figcaption></figcaption></figure>


# Asset Browsers

Soulslike Framework provides custom browsers for our custom data types. You can use these browsers to easily navigate to and/or edit your data with ease. The provided browsers behave similarly to the Content Browser and use the **Asset Registry** to locate and track your assets.

### Item Browser

<figure><img src="/files/7LD3vW8ZtYZedCaqcb1L" alt=""><figcaption></figcaption></figure>

### Weapon Ability Browser

<figure><img src="/files/ALVHkX0MEyVrWsx16Zo6" alt=""><figcaption></figcaption></figure>

### Weapon Animset Browser

<figure><img src="/files/EVVnR7FmRCvGLyUgz8Ix" alt=""><figcaption></figcaption></figure>

### Action Browser

<figure><img src="/files/HbUV2SydcUyraC5VN6RR" alt=""><figcaption></figcaption></figure>

### Status Effect Browser

<figure><img src="/files/aQ3I2ggFghvzMzqPDlx2" alt=""><figcaption></figcaption></figure>


# Actor Tags

Actor tags are mainly used for overlap & tracing logic. They play a crucial role in determining if the detected actor is the **Player**, an **Enemy** or a **World** object.

{% hint style="danger" %}
If you're having issues related to *tracing actors*, ensure that they have the appropriate **Actor Tags** assigned from their **Class Defaults**.
{% endhint %}

### By default;

* **B\_Soulslike\_Character** (Soulslike Player class) has the **"Player"** tag.
* **B\_Soulslike\_Enemy** (Soulslike Enemy class) has the **"Enemy"** tag.
* Any world actor which should affect weapon tracing has the **"World"** tag.

<figure><img src="/files/LUNbY1ovFSXPq503TWzL" alt=""><figcaption></figcaption></figure>


# Finding References

Working with a large-scale framework often requires you to understand how various systems and functions interact. Unreal Engine's **Reference Viewer** is an invaluable tool for this. It allows you to see all the references to a specific function, property, or asset within the project.&#x20;

By analyzing these references, you can uncover how different components are interconnected and where specific logic is implemented. Using the **Reference Viewer**, you can:

* **Identify** where a specific asset or function is used.
* **Track dependencies** to ensure that changes are safe and non-disruptive.
* **Gain a deeper understanding** of how the framework’s systems are built and interwoven.

This practice will save you countless hours of debugging and trial-and-error, ensuring your changes align with the overall design.

### Example Usage:

<figure><img src="/files/HqAoq9JTv4LNyU80bde8" alt=""><figcaption></figcaption></figure>

<figure><img src="/files/o4iMUdhDoD0T4GPMHG7w" alt=""><figcaption></figcaption></figure>


# Using a Custom Character

<figure><img src="/files/ia1bmxQrHX72nRYZVqPK" alt=""><figcaption></figcaption></figure>

Characters in Soulslike Framework are broken down into **4 modular parts** for customization/equipment:

1. **Head**
2. **Upper body**&#x20;
3. **Arms**
4. **Lower Body**

### If you do not have a modular mesh:

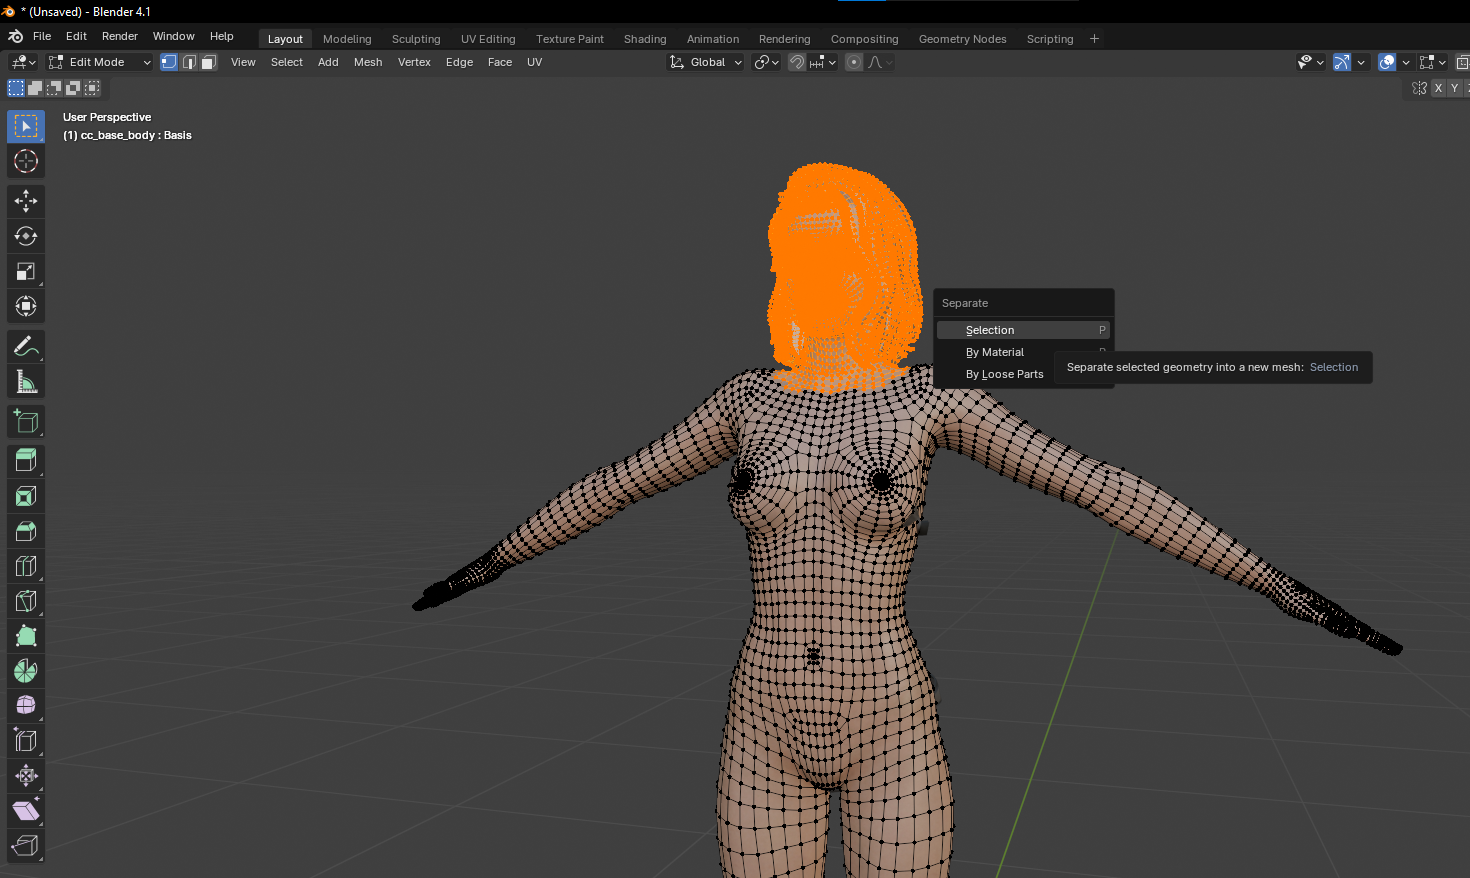
If you are not using a modular character, you can use **any 3D software** to easily break down your character to pieces.

<figure><img src="/files/wFufxB9DR5DGXkX49fJo" alt=""><figcaption></figcaption></figure>

<figure><img src="/files/Gd2un9VI72IoCTKrOrN6" alt=""><figcaption></figcaption></figure>

Ensure that your modular pieces are attached to whatever skeleton you are using:

<figure><img src="/files/HUVxyjgHmxL6Njg9GMNW" alt=""><figcaption></figcaption></figure>

Import each modular piece separately into Unreal Engine.

<figure><img src="/files/hpQq4HOzgcBW3bhRRjot" alt=""><figcaption></figcaption></figure>

*If you are struggling with this process, please take a look at this short video:*

{% embed url="<https://www.youtube.com/watch?v=19nbbtwGX9U>" %}

### If you have a modular mesh:

1. Create a new **DefaultMeshData** data asset (PDA\_DefaultMeshData) and add your new meshes in this asset:

<figure><img src="/files/VekigUItIFXNNip0qnGW" alt=""><figcaption></figcaption></figure>

<figure><img src="/files/vTycmcfVHxtP3JiDWcyc" alt=""><figcaption></figcaption></figure>

2. Create a new **BaseCharacterInfo** asset (PDA\_BaseCharacterInfo) or edit the provided DA\_Quinn/DA\_Manny assets, adding your new mesh/data:

<figure><img src="/files/nWjgXedgfnnj5zbyMrPS" alt=""><figcaption></figcaption></figure>

<figure><img src="/files/0f3ynsp4xVvFp99heSF5" alt=""><figcaption></figcaption></figure>

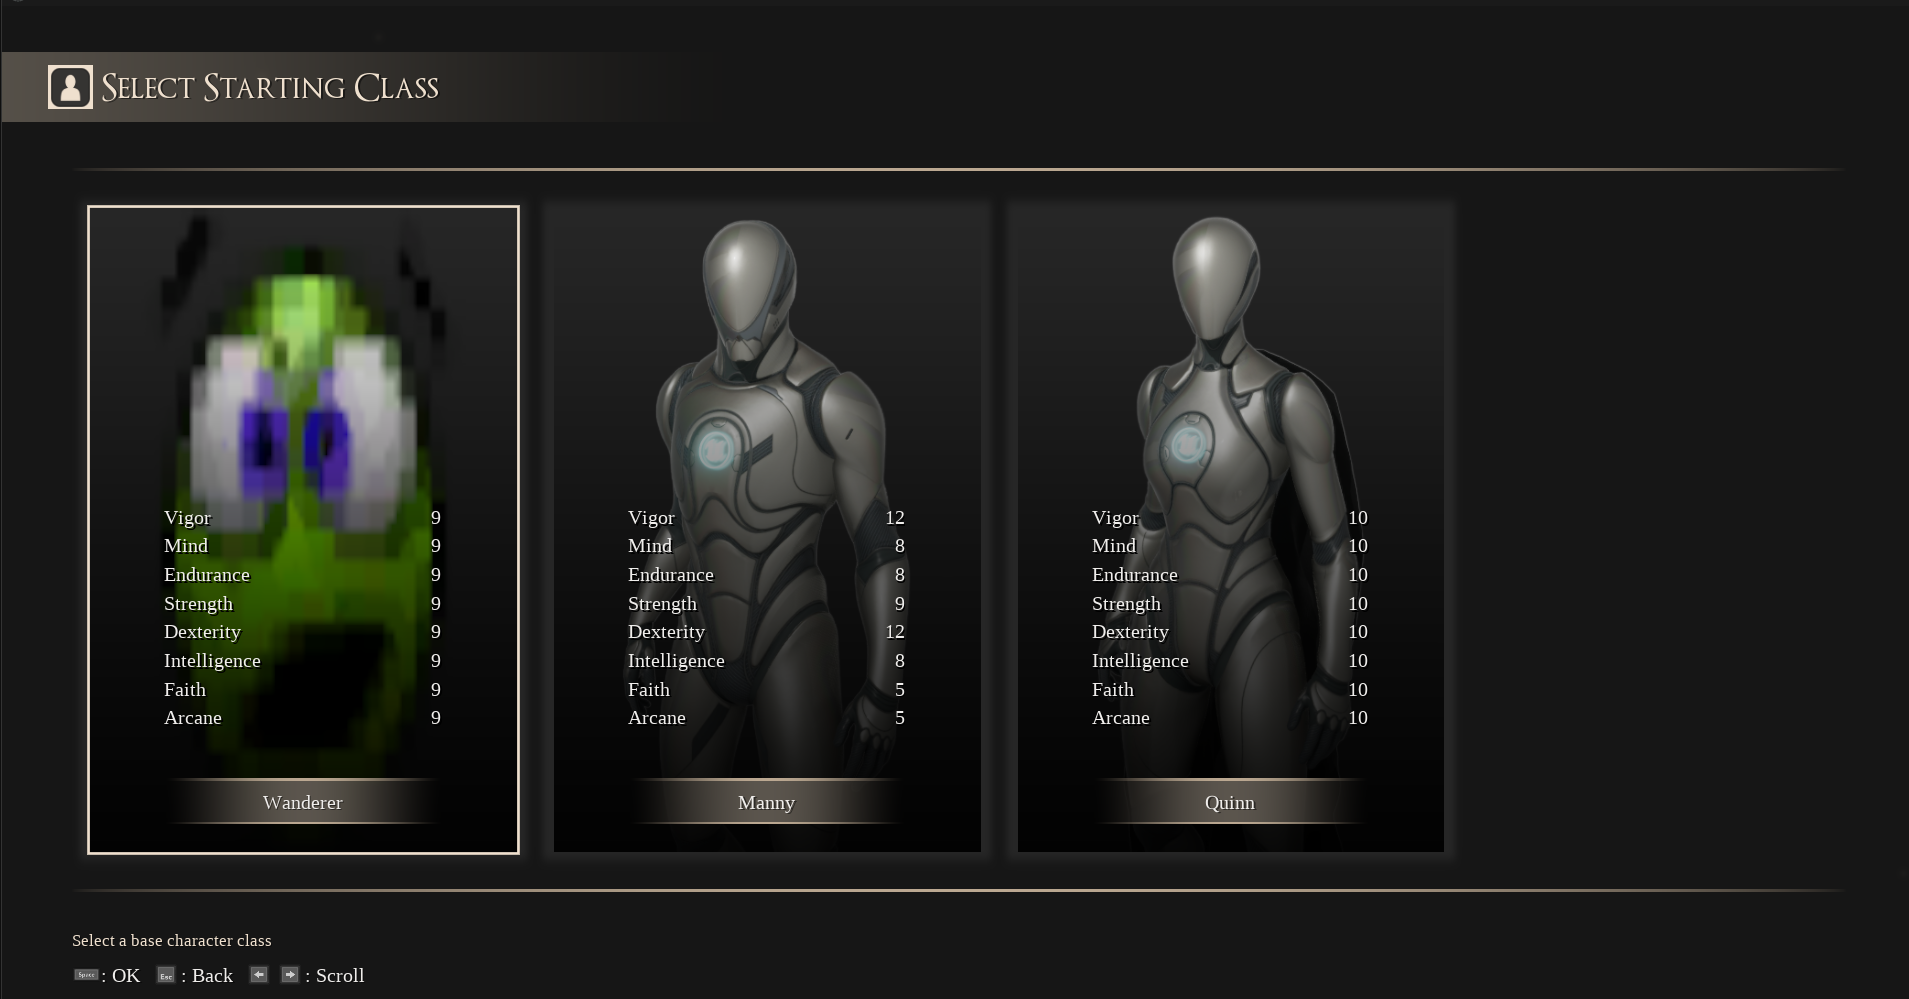
You're done! You will now see the new class you created on the **New Game** menu, and if you select that class, you will start with your character!

<figure><img src="/files/q2kx0He3TkQhYMAQ4nUA" alt=""><figcaption></figcaption></figure>

<figure><img src="/files/rpjA1ZdcGfds1Me69egf" alt=""><figcaption></figcaption></figure>

{% hint style="info" %}
You can adjust the *default base character that'll be picked if the game is not started through the main menu* from **GI\_SoulslikeFramework**.
{% endhint %}

## Using Metahumans

You can follow the tutorial below to understand how you can use a Metahuman as your player character:

{% embed url="<https://www.youtube.com/watch?index=2&list=PL_54Gye2atq6QCx4F74fmkSHRu5F7u8ky&v=O6lPkQFGcGs>" %}


# Creating & Editing Actions

<div data-full-width="false"><figure><img src="/files/aHFIwVWI2tHzC10mkroi" alt=""><figcaption></figcaption></figure></div>

In Soulslike Framework, everything can be considered an Action. Provided with the project are multiple example Actions that you can inspect.

Actions work hand-to-hand with the [**Input Buffer Component**](/components-managers/player-specific-components/input-buffer)**.** That means they can be queued & consumed.&#x20;

### Using the Utility Tools to Create/Edit Actions

1. Run the **Soulslike Action Creator** from the Soulslike Framework editor dropdown, or head into **/SoulslikeFramework/\_Utility/Creators** and right-click and Run Utility Widget -> **EUW\_ActionCreator:**

<figure><img src="/files/lo0jzjZ4FTYQOKGYiPXX" alt=""><figcaption></figcaption></figure>

2. Fill in the details as you desire:

<figure><img src="/files/lzMQ9c8BvLAOHGrqJzoW" alt=""><figcaption></figcaption></figure>

3. Click **Create Action** to generate the related assets.
4. Now, run the **Soulslike Action Browser** from the Soulslike Framework editor dropdown or head into **/SoulslikeFramework/\_Utility/Browsers** and right-click and Run Utility Widget -> **EUW\_ActionBrowser:**

<figure><img src="/files/UDqiXZjrWhG2myVC50Lh" alt=""><figcaption></figcaption></figure>

3. Find your action and select it in the Browser. Double-check its properties to ensure everything is correct. Then click **"Open Logic"** to open the Action's logic asset:

<figure><img src="/files/PrSAc205DrGCSrecOI0i" alt=""><figcaption></figcaption></figure>

6. If the assets opens in Data-Only mode, click the **Open Full Blueprint Editor** text.

<figure><img src="/files/SAlwibwvde16ZZw5Pg5L" alt=""><figcaption></figcaption></figure>

7. Go to the **Functions** tab and override `ExecuteAction():`&#x20;

<figure><img src="/files/gEKYX2qW6xmqSdM9sTLm" alt=""><figcaption></figcaption></figure>

<figure><img src="/files/ddQZrbKFUxS3MC4o0SGH" alt=""><figcaption></figcaption></figure>

8. (Optional) You can also add a new event graph and override the **Event** version of the method:

<figure><img src="/files/WkEUBmqDgfz7cfS3zETS" alt=""><figcaption></figcaption></figure>

8. Next up, we need to let our [**Action Manager**](/components-managers/player-specific-components/action-manager) know that we want to initialize this new Action. Head inside **B\_Soulslike\_Character** and select **AC\_ActionManager:**

<figure><img src="/files/79GQO6cS1PB3Yv7SLodC" alt=""><figcaption></figcaption></figure>

{% hint style="danger" %}
If you are using an **Override Table**, the **Actions map will be overridden.**&#x20;
{% endhint %}

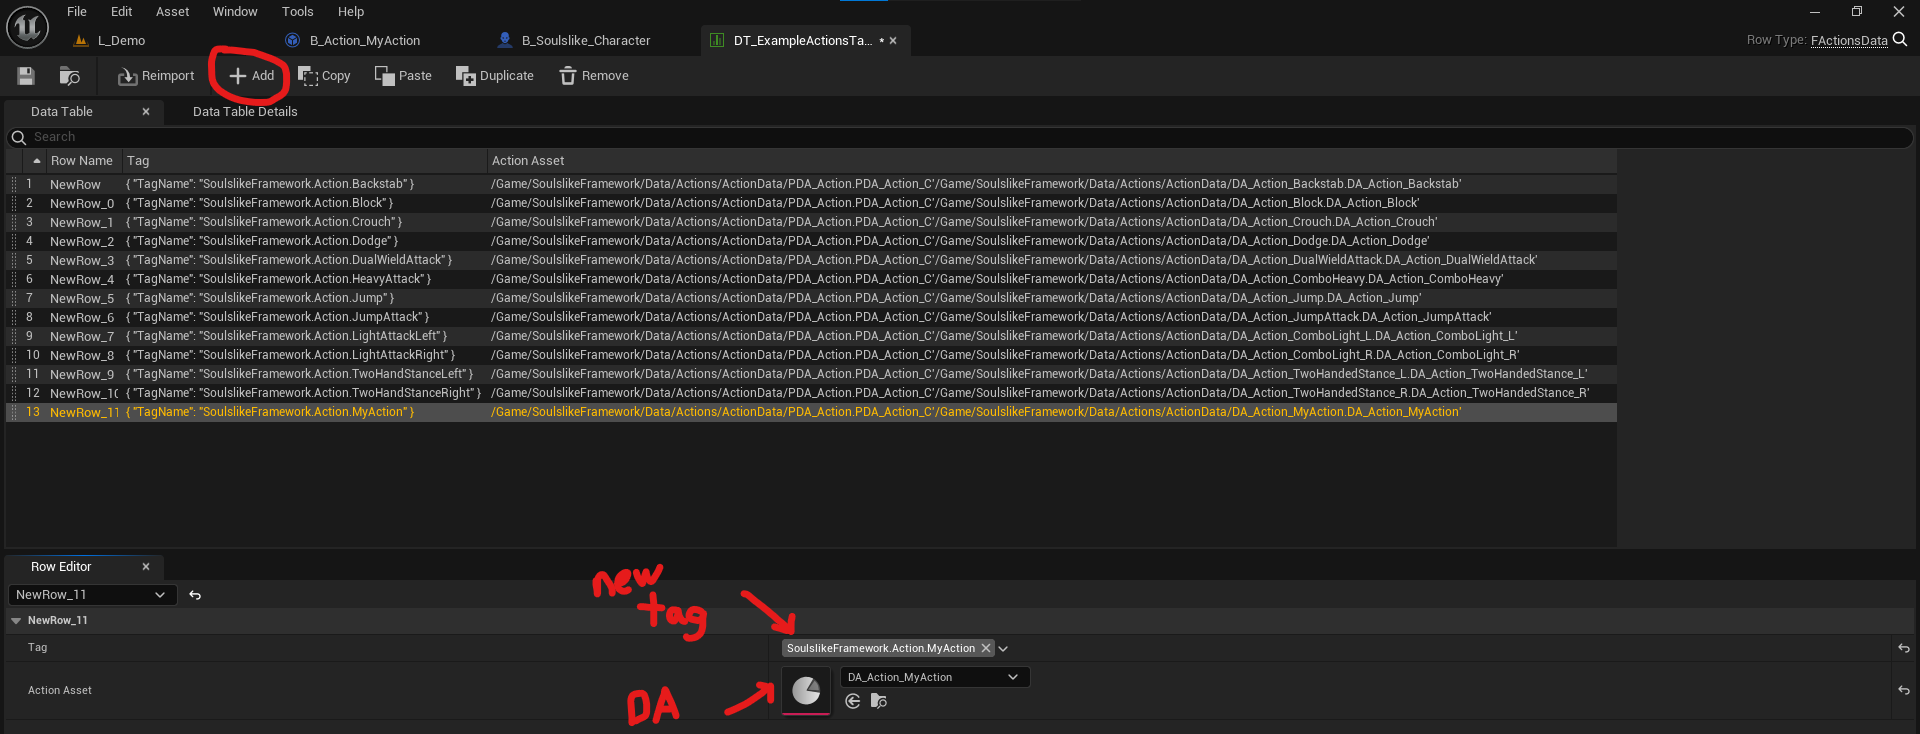
10. Create a new Gameplay Tag for your action. Then, add your new Action to either the **table** or the **Actions map** using the new Gameplay Tag & Action Data Asset:

<figure><img src="/files/TYPRElHthew93OOSGPir" alt=""><figcaption></figcaption></figure>

11. Finally, using performing the Action **(Inside B\_Soulslike\_Character):**

<figure><img src="/files/hp4nhQlNCBrXutB0kDrL" alt=""><figcaption></figcaption></figure>

<figure><img src="/files/4SplT065NlnGA63RIRvB" alt=""><figcaption></figcaption></figure>

<figure><img src="/files/NYafNIKL9iYRZ7dZ7WqN" alt=""><figcaption></figcaption></figure>


# Creating & Editing Stats/Attributes

<figure><img src="/files/9U6JKdC6L1T8N5teRzRY" alt=""><figcaption></figcaption></figure>

### Creating a New Stat/Attribute

{% hint style="info" %}
We haven't provided Utility tools for creating/editing Stat/Attributes purely because their workflow won't be as repetitive.
{% endhint %}

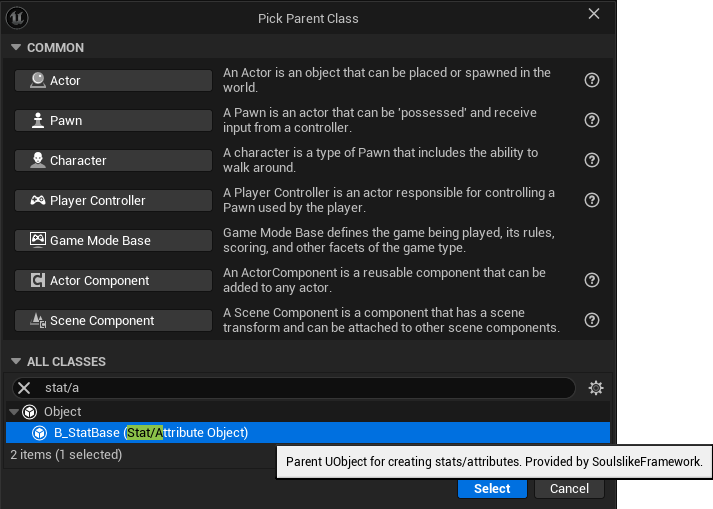
Stats/Attributes are created as UObjects and managed by the [Stat Manager component.](/components-managers/shared-components/stat-attribute-manager) To create a new Stat/Attribute, head into a relevant directory (e.g, SoulslikeFramework/Data/\_Stats/), right-click the Content Browser and search for **"Stat/Attribute Object"**.

<figure><img src="/files/OD98R8phTjBKxD4ntngw" alt=""><figcaption></figcaption></figure>

Open the newly created asset and adjust the properties in the **Config** tab to your liking.

<figure><img src="/files/hxONzBzSv7DgjcY1XkmC" alt=""><figcaption></figcaption></figure>

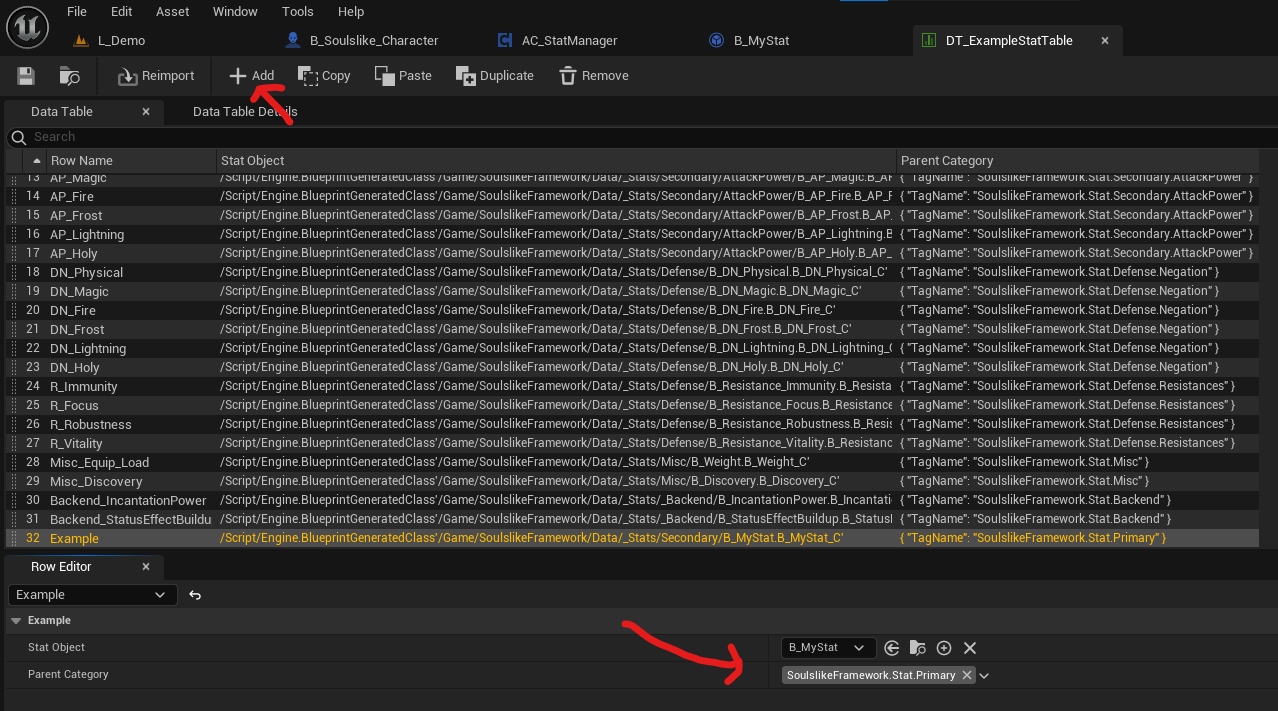
When finished, [add your newly created Stat/Attribute the the Stat Manager component.](/components-managers/shared-components/stat-attribute-manager#adjusting-which-stats-attributes-to-initialize)

<figure><img src="/files/7GYKGBeBpPzkKi7fxqyQ" alt=""><figcaption></figcaption></figure>

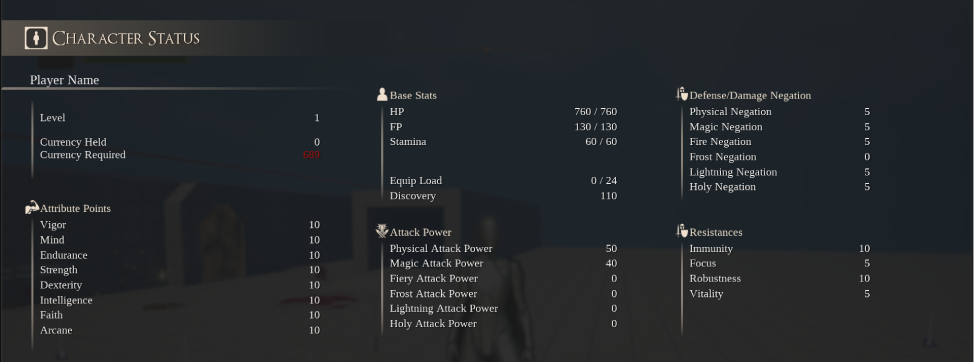
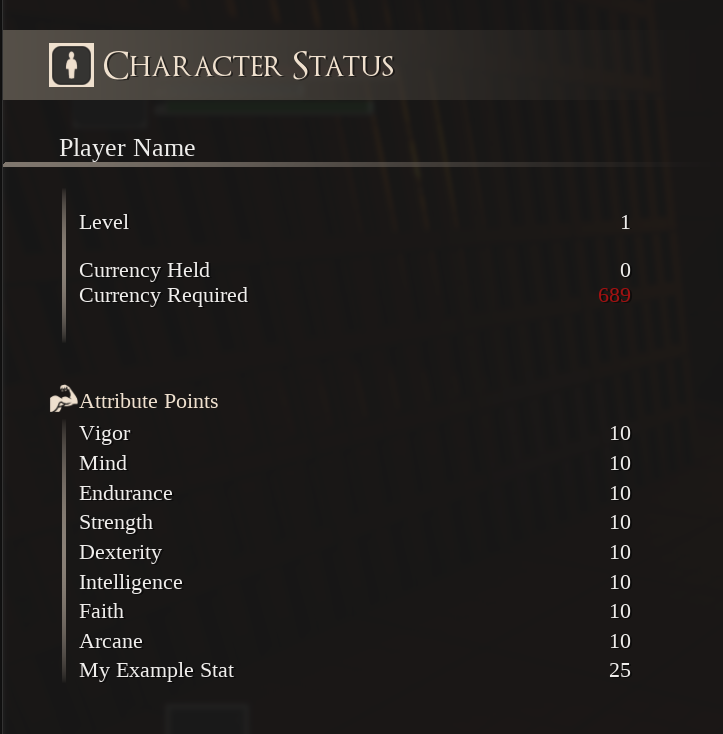
Now you will see your newly created Stat/Attribute in-game, automatically added to the UI. Where it is added is determined by the Parent Category property.

<figure><img src="/files/KDgjMUDSAJA0p6h8izNC" alt=""><figcaption></figcaption></figure>


# Creating & Editing Status Effects

<figure><img src="/files/ZCgtxvGXhhBWR8fYkQUU" alt=""><figcaption></figcaption></figure>

### Using the Utility Tools to Create & Edit Status Effects

1. Run the **Soulslike Status Effect Creator** from the Soulslike Framework editor dropdown or head into **/SoulslikeFramework/\_Utility/Creators** and right-click and Run Utility Widget -> **EUW\_StatusEffectCreator:**

<figure><img src="/files/IyPXpZqCD5fUQarLzbMN" alt=""><figcaption></figcaption></figure>

2. Fill in the details as you desire:

<figure><img src="/files/cKhVlZ0S4hPkwt5XesrG" alt=""><figcaption></figcaption></figure>

3. On the **Ranks** dropdown, you might notice something different. The **RelevantData** property is of type **FInstancedStruct**. This property can be used to send in any type of data to the Status Effect logic class. Search for **"FStatus"** to see Status Effect related structs provided by the framework:

<figure><img src="/files/A5rZfhu3RqiXLZzY6SRa" alt=""><figcaption></figcaption></figure>

4. For this example, lets use **FStatusEffectStatChanges** to just adjust some stats when this status effect is triggered. We'll adjust FP & Stamina:

<figure><img src="/files/wcymUUEHfIQGE2lp9AX9" alt=""><figcaption></figcaption></figure>

5. Finalize by clicking **Create Status Effect.**
6. To test your new Status Effect, put one of the actors **B\_StatusEffectArea** or **B\_StatusEffectOneShot** into your level. Configure its **StatusEffectToApply & Effect Rank** properties:

<figure><img src="/files/gHuOuUn9CGeqwBboFBvM" alt=""><figcaption></figcaption></figure>

7. You will notice the new Status Effect build up when overlapping this actor:

<figure><img src="/files/9qwD0EKnG4RXwj1TwUJ8" alt=""><figcaption></figcaption></figure>

8. And when Buildup reaches 100%, your Status Effect will be triggered:

<figure><img src="/files/5td59qm6HcUhFChwTHpN" alt=""><figcaption></figcaption></figure>

### Advanced: Creating Custom Trigger Behavior

If you want a unique trigger behavior for a Status Effect , you can easily override the `EffectTriggered` function inside your new Status Effect logic class and customize it.

{% hint style="info" %}
**DA\_StatusEffect\_Frostbite** is an example Status Effect that has custom behavior. When triggered, it will reduce stamina and **decrease the player's movement speed**. You can also inspect this Status Effect to get an idea on how to implement your own custom logic.
{% endhint %}

1. Start by creating a new **Struct** and add in properties that you will be relevant for your effect. In this example, we will make our new **Plague** status effect adjust the stats of the player AND reduce the scale of the player. For this, we will add 3 properties to our struct:
   1. **FStatusEffectStatChanges** (Stat Changes)
   2. **Float** (New Scale)
   3. **Float** (Duration)

<figure><img src="/files/7js0mKyUNPEUfupK9z5f" alt=""><figcaption></figcaption></figure>

2. Run the **Soulslike Status Effect Browser** from the Soulslike Framework editor dropdown or head into **/SoulslikeFramework/\_Utility/Browsers** and right-click and Run Utility Widget -> **EUW\_StatusEffectBrowser.**

<figure><img src="/files/R1zVrCKWCetJfOxuhJx8" alt=""><figcaption></figcaption></figure>

3. Find our new Status Effect and adjust its **RelevantData** property to use our new Struct:

<figure><img src="/files/OG7utiw5biUfh09oCVnv" alt=""><figcaption></figcaption></figure>

4. Click on **Open Logic** to open the class blueprint. Override the `EffectTriggered` method and start writing your logic. You can take a look at the **parent Status Effect Object** class and/or the **Frostbite Status Effect** for reference.

<figure><img src="/files/Fd6IdYs3VZOER2WCLoRc" alt=""><figcaption></figcaption></figure>

The example above will:

* Adjust all provided Stats negatively
* Set the Owner (player character)'s scale to the desired value, and after the duration, reset it back to 1.0f.

{% hint style="danger" %}
**IMPORTANT:** Overriding the `EffectTriggered` method means that you lose access to the parent trigger functionality. This means that if you create a new Rank with a different **RelevantData** type, it will not execute unless you're specifically handling that data type.&#x20;

You can *Add Call to Parent* but this might result in unwanted behavior.

An acceptable way of doing this would be through copying some of the `EffectTriggered` logic from the parent **Status Effect Object** class to your new Status Effect class.
{% endhint %}

{% embed url="<https://www.youtube.com/watch?v=6Sw_i3q22HY>" %}


# Creating & Editing Buffs

<figure><img src="/files/ZCgtxvGXhhBWR8fYkQUU" alt=""><figcaption></figcaption></figure>

### Using the Utility Tools to Create & Edit Status Effects

1. Run the **Soulslike Status Effect Creator** from the Soulslike Framework editor dropdown or head into **/SoulslikeFramework/\_Utility/Creators** and right-click and Run Utility Widget -> **EUW\_StatusEffectCreator:**

<figure><img src="/files/IyPXpZqCD5fUQarLzbMN" alt=""><figcaption></figcaption></figure>

2. Fill in the details as you desire:

<figure><img src="/files/cKhVlZ0S4hPkwt5XesrG" alt=""><figcaption></figcaption></figure>

3. On the **Ranks** dropdown, you might notice something different. The **RelevantData** property is of type **FInstancedStruct**. This property can be used to send in any type of data to the Status Effect logic class. Search for **"FStatus"** to see Status Effect related structs provided by the framework:

<figure><img src="/files/A5rZfhu3RqiXLZzY6SRa" alt=""><figcaption></figcaption></figure>

4. For this example, lets use **FStatusEffectStatChanges** to just adjust some stats when this status effect is triggered. We'll adjust FP & Stamina:

<figure><img src="/files/wcymUUEHfIQGE2lp9AX9" alt=""><figcaption></figcaption></figure>

5. Finalize by clicking **Create Status Effect.**
6. To test your new Status Effect, put one of the actors **B\_StatusEffectArea** or **B\_StatusEffectOneShot** into your level. Configure its **StatusEffectToApply & Effect Rank** properties:

<figure><img src="/files/gHuOuUn9CGeqwBboFBvM" alt=""><figcaption></figcaption></figure>

7. You will notice the new Status Effect build up when overlapping this actor:

<figure><img src="/files/9qwD0EKnG4RXwj1TwUJ8" alt=""><figcaption></figcaption></figure>

8. And when Buildup reaches 100%, your Status Effect will be triggered:

<figure><img src="/files/5td59qm6HcUhFChwTHpN" alt=""><figcaption></figcaption></figure>

### Advanced: Creating Custom Trigger Behavior

If you want a unique trigger behavior for a Status Effect , you can easily override the `EffectTriggered` function inside your new Status Effect logic class and customize it.

{% hint style="info" %}
**DA\_StatusEffect\_Frostbite** is an example Status Effect that has custom behavior. When triggered, it will reduce stamina and **decrease the player's movement speed**. You can also inspect this Status Effect to get an idea on how to implement your own custom logic.
{% endhint %}

1. Start by creating a new **Struct** and add in properties that you will be relevant for your effect. In this example, we will make our new **Plague** status effect adjust the stats of the player AND reduce the scale of the player. For this, we will add 3 properties to our struct:
   1. **FStatusEffectStatChanges** (Stat Changes)
   2. **Float** (New Scale)
   3. **Float** (Duration)

<figure><img src="/files/7js0mKyUNPEUfupK9z5f" alt=""><figcaption></figcaption></figure>

2. Run the **Soulslike Status Effect Browser** from the Soulslike Framework editor dropdown or head into **/SoulslikeFramework/\_Utility/Browsers** and right-click and Run Utility Widget -> **EUW\_StatusEffectBrowser.**

<figure><img src="/files/R1zVrCKWCetJfOxuhJx8" alt=""><figcaption></figcaption></figure>

3. Find our new Status Effect and adjust its **RelevantData** property to use our new Struct:

<figure><img src="/files/OG7utiw5biUfh09oCVnv" alt=""><figcaption></figcaption></figure>

4. Click on **Open Logic** to open the class blueprint. Override the `EffectTriggered` method and start writing your logic. You can take a look at the **parent Status Effect Object** class and/or the **Frostbite Status Effect** for reference.

<figure><img src="/files/Fd6IdYs3VZOER2WCLoRc" alt=""><figcaption></figcaption></figure>

The example above will:

* Adjust all provided Stats negatively
* Set the Owner (player character)'s scale to the desired value, and after the duration, reset it back to 1.0f.

{% hint style="danger" %}
**IMPORTANT:** Overriding the `EffectTriggered` method means that you lose access to the parent trigger functionality. This means that if you create a new Rank with a different **RelevantData** type, it will not execute unless you're specifically handling that data type.&#x20;

You can *Add Call to Parent* but this might result in unwanted behavior.

An acceptable way of doing this would be through copying some of the `EffectTriggered` logic from the parent **Status Effect Object** class to your new Status Effect class.
{% endhint %}

{% embed url="<https://www.youtube.com/watch?v=6Sw_i3q22HY>" %}


# Creating & Editing Items

<figure><img src="/files/gMO5tCKETWz7krqr5QFV" alt=""><figcaption></figcaption></figure>

### Using the Utility Tools to Create Items

The easiest method of creating new items is by using the **Soulslike Item Creator.**

<figure><img src="/files/Do94SOwL63BsqmZsT4Ns" alt=""><figcaption></figcaption></figure>

When you first start this tool, you will notice a few categories. You can open each category and fill in the data as you desire, according to the type of item you are making:

<figure><img src="/files/sKWTcNg8zVO3h86mHJmW" alt=""><figcaption></figcaption></figure>

To use your item in-game, all you need to do is add a **B\_PickupItem** actor to your world and select the new Item Asset that you've created through the **Soulslike Item Creator**:

<figure><img src="/files/Nf0eToNeSjJfy96tJPV2" alt=""><figcaption></figcaption></figure>


# Creating & Editing Weapons

<figure><img src="/files/ZTyUq2jP85KEglnrgvdY" alt=""><figcaption></figcaption></figure>

### Using the Utility Tools to Create & Edit Weapons

Weapons are one of the few items that **require a world Actor.**&#x20;

1. Begin by creating a new Weapon Actor class of type **B\_Item\_Weapon** for your new weapon:

<figure><img src="/files/cLtn1RYGDDsHlphy5pSg" alt=""><figcaption></figcaption></figure>

2. Adjust the **Mesh** to your liking. Optionally, you can use the debug visualizers for the placement of your mesh:

<figure><img src="/files/HejpDB64Vep17RCieMkv" alt=""><figcaption></figcaption></figure>

2. (Optional) Add your trail effect (toggled through the [Trail Notify](/animation-notifies/feedback/weapon-trail-notify))

<figure><img src="/files/meHyA4BYBz74sp4j774P" alt=""><figcaption></figcaption></figure>

3. Go into your mesh and add a **Starting & Ending Socket.** You can do this through the **Socket Manager** window. If you do not have it, you can toggle it from *Window -> Socket Manager.* This is necessary for the weapon tracing system (**AC\_CollisionManager) .**

<figure><img src="/files/IcLFlPpQpvmkCWEv8StC" alt=""><figcaption></figcaption></figure>

4. Finally back in your new Weapon actor, select **AC\_CollisionManager** component and adjust its Config tab according to your new sockets:

<figure><img src="/files/C8kjwT39iiLVT7IZn1eF" alt=""><figcaption></figcaption></figure>

5. Run **Soulslike Item Creator** from the Soulslike Framework editor dropdown or head into **/SoulslikeFramework/\_Utility/Creators** and right-click and Run Utility Widget -> **EUW\_ItemCreator:**

<figure><img src="/files/So1SlIJONiznbcgZ10j7" alt=""><figcaption></figcaption></figure>

6. Fill in the details as you desire. If you are unsure of any field, feel free to leave it empty. You can always edit your Item properties easily through the **Item Browser** utility tool.

<figure><img src="/files/i4Xg4pbLEY65E11uy15Z" alt=""><figcaption></figcaption></figure>

{% hint style="danger" %}
**IMPORTANT:** The **Overlay Tag** property determines the default wielded stance for your weapon. This property is *Experimental*, and using **SoulslikeFramework.Equipment.Weapons.Overlay.OneHanded** is recommended.
{% endhint %}

7. Add a **Pickup Actor (B\_PickupItem)** to your world, and select your newly created Item asset on the **Config** tab.

<figure><img src="/files/IgVZ1DNk8YKygkftbyUV" alt=""><figcaption></figcaption></figure>

<figure><img src="/files/gz8NKfpL3WaXAgBYLwM9" alt=""><figcaption></figcaption></figure>

8. You can now loot your item and find it in your **Inventory & Equipment** widgets!

<figure><img src="/files/1GdzJAcmqpy0gT8lmq02" alt=""><figcaption></figcaption></figure>

<figure><img src="/files/KrQjEYJdtegV6PxZpKbw" alt=""><figcaption></figcaption></figure>

<figure><img src="/files/gP3c6HBICoKplBmUGTd4" alt=""><figcaption></figcaption></figure>

If you are not happy with how your character holds your new weapon, you can always edit its positioning in the item's **world actor** until you get a look you're happy with:

{% embed url="<https://www.youtube.com/watch?v=fO9UW2BPeYk>" %}

### Creating/Editing Weapon Movesets

1. Run the **Soulslike Weapon Animset Creator** from the Soulslike Framework editor dropdown or head into /SoulslikeFramework/*Utility/Creators and Run Utility Widget ->* **EUW\_WeaponAnimsetCreator:**

<figure><img src="/files/4JjPOMp8ouf8fKTdyYMm" alt=""><figcaption></figcaption></figure>

2. Fill in the necessary montages as you desire. For more information, [check out the Setup Custom Montages page.](/getting-started/quickstart/setup-custom-montages)

<figure><img src="/files/qoZKU7Y1J4KVf5BZUUE4" alt=""><figcaption></figcaption></figure>

3. Finally, click **Create Moveset** to create the new weapon moveset asset.
4. Run **Soulslike Item Browser** from the Soulslike Framework editor dropdown or head into /SoulslikeFramework/*Utility/Browsers and* Run Utility Widget *->* **EUW\_ItemBrowser:**

<figure><img src="/files/KfWuleK7WqQkLcJqEXrz" alt=""><figcaption></figcaption></figure>

5. Select your new item and assign the new moveset:

<figure><img src="/files/AxqYrOXMpoIeB5C0QXwQ" alt=""><figcaption></figcaption></figure>

5. If you've setup your montages correctly, your attacks should now be playing the correlated montage:

<figure><img src="/files/RUaWOzBJpe5RXndfn7sp" alt=""><figcaption></figcaption></figure>

### Creating/Editing Weapon Abilities

Weapon abilities can be created either by using the **Soulslike Weapon Ability Creator** or by manually duplicating/creating a Data Asset derived from **PDA\_WeaponAbility.**

<figure><img src="/files/AMhQAWlR4YYi9ZrurOeO" alt=""><figcaption></figcaption></figure>

Fill in the details as you desire:

<figure><img src="/files/mPqkJbHEJKlxVa3ddRtD" alt=""><figcaption></figcaption></figure>

**Additional Effect** is an actor that will be spawned when the ability is used. You can add any customized logic this way. This field is **optional**.

Ensure that you have setup your **Ability Montage** correctly. You can follow the [Setup Custom Montages](/getting-started/quickstart/setup-custom-montages) page for more details on creating montages.

<figure><img src="/files/9VIAcHZaXBHAOVRm0Mxg" alt=""><figcaption></figcaption></figure>

Finally, assign the new ability to your weapon. This can be done through **Soulslike Item Browser** or through the corresponding **PDA\_Item** asset:

<figure><img src="/files/3hm34OjRj5MipzBQwSNF" alt=""><figcaption></figcaption></figure>

That's it! Now you should have your new ability on your weapon:

<figure><img src="/files/gi03riBC5HJVahQu5Csg" alt=""><figcaption></figcaption></figure>

{% hint style="warning" %}
By default, **Weapon Ability Slot** is set to be **Right Hand**. That means that only weapons equipped on the slots that are considered Right Hand slots can have an ability.

You can adjust this to your liking through **PC\_SoulslikeFramework -> AC\_EquipmentManager.**
{% endhint %}

<figure><img src="/files/9i3MFLYZbb5sKjciQxWj" alt=""><figcaption></figcaption></figure>

### Creating/Editing Weapons for AI

**AI Weapons** use the same data of an existing weapon asset you have. For example, if we have DA\_Greatsword, we do **not** need another asset for the AI version.

All we want to do is instead of using the **B\_Item\_Weapon** class, use **B\_Item\_Weapon\_AI** class as the world actor.&#x20;

After setting up the actor, ensure that you **select the corresponding item asset in the AI weapon class:**

<figure><img src="/files/j6gWyCcg561rqtk5Obok" alt=""><figcaption></figcaption></figure>


# Creating an Enemy

<figure><img src="/files/254wZ9pzBBtXVGfW2slm" alt=""><figcaption></figcaption></figure>

### Creating the Character & Setting up the Components

1. Create a new blueprint derived from **Soulslike Enemy (B\_Soulslike\_Enemy).**

<figure><img src="/files/1pv24kBzIlJtfyP14Dwm" alt=""><figcaption></figcaption></figure>

2. Assign your character mesh & the relevant Animation Blueprint you'd like to use:

{% hint style="info" %}
If your character is Epic skeleton compatible, you can use the Animation Blueprint & the Animation Blendspace provided by Soulslike Framework.
{% endhint %}

<figure><img src="/files/5529guT3gaMw45LMOtlG" alt=""><figcaption></figcaption></figure>

3. **(Optional)** If your character will be using weapon(s), add a **Child Actor Component** to your Mesh. Select the world actor **(derived from B\_Item\_Weapon\_AI)** for the weapon you'd like your enemy to use:

{% hint style="success" %}
For more information about creating **AI Weapons**, check out our guide on [Creating & Editing Weapons for AI](/workflow/creating-and-editing-items/creating-and-editing-weapons#creating-editing-weapons-for-ai).
{% endhint %}

<figure><img src="/files/51f0LrhBWTn7rwzX9GAg" alt=""><figcaption></figcaption></figure>

4. **(Optional)** Setup your loot table for the enemy under the **AC\_LootDropManager** component. For more information, [read about the Loot Drop Manager component here](/components-managers/shared-components/loot-drop-manager).

<figure><img src="/files/iKcMMwOJv77ULVVTG41f" alt=""><figcaption></figcaption></figure>

5. Setup movement speed & stats/attributes for your enemy under the **AC\_StatManager** component. Additionally, you can override any stat/attribute you want and adjust their values from this component. For more information, [read about the Stat Manager component here](/components-managers/shared-components/stat-attribute-manager).

<figure><img src="/files/nSkQLwfoB3CESRAarn9k" alt=""><figcaption></figcaption></figure>

6. Setup AI behavior for your enemy under the **AC\_AI\_BehaviorManager** component. For more information, [read about the AI Behavior Manager component here](/components-managers/ai-only-components/ai-behavior-manager).

<figure><img src="/files/6kzajZq7wh99YPuG6PQO" alt=""><figcaption></figcaption></figure>

7. Finally, setup combat related data for your enemy under the **AC\_AI\_CombatManager** component. For more information, [read about the AI Combat Manager component here](/components-managers/ai-only-components/ai-combat-manager).

<figure><img src="/files/jIXApglwzBTOMXX68AUB" alt=""><figcaption></figcaption></figure>

{% hint style="warning" %}
If your Enemy character will not be using a weapon, ensure that you fill in the **Unarmed** category correctly under **AC\_AI\_CombatManager.**
{% endhint %}

### Creating AI Abilities

Soulslike Framework uses a data-asset based, scored ability system for every enemy's abilities. To create new abilities, click on the Soulslike Framework dropdown and select the **AI Ability Creator**:

<figure><img src="/files/lvsagzWnXlKLBEHHrb07" alt=""><figcaption></figcaption></figure>

For each ability, you can define the corresponding **montage**, its **score** (weight based), its **cooldown** and custom **rules**. For more information on creating montages & utilizing notifies, [check out our Setup Custom Montages](/getting-started/quickstart/setup-custom-montages) page.

<figure><img src="/files/mNZK9YceJBtB73wvH68p" alt=""><figcaption></figcaption></figure>

After creating the ability, do not forget to assign it to your enemy's **AC\_AI\_CombatManager!**

### Advanced: New/Custom Ability Rules

The framework provides two rules - **Distance (FAiRuleDistance) & Stat (FAiRuleStat)**. These rules are structures that contain relevant data. They are located in **/SoulslikeFramework/Structures/AI/Rules.**

With the use of **Instanced Structures,** you can create your own rules by creating a new structure with the relevant data and adjusting the **EvaluateAbilityRule()** function inside **AC\_AI\_CombatManager.**

#### Example #1 - Target (player) Stat Rule

For this example, we'll create a rule which is **capable of checking any Stat of the player**. Start by duplicating the **FAiRuleStat** rule and rename it appropriately (or just create a new struct):

<figure><img src="/files/XKx4TWUA3N0SqO7muXcL" alt=""><figcaption></figcaption></figure>

Next, adjust the EvaluateAbilityRule() function to take into consideration this new rule we created:

<figure><img src="/files/NRwyx3dy6ivKYNWgQFuS" alt=""><figcaption></figcaption></figure>

<figure><img src="/files/cudfKDu3KKeENOCJQHXX" alt=""><figcaption></figcaption></figure>

Finally, utilize the rule in any AI Ability you have:

<figure><img src="/files/fiQdZqNHnnsmoZA5rwoO" alt=""><figcaption></figcaption></figure>

<figure><img src="/files/3RpccK3ZoX8ulzNMfhgd" alt=""><figcaption><p>After the player's health drops below 95%, enemy can no longer execute the ability - thus strafing randomly.</p></figcaption></figure>

#### Example #2 - Input Reading Rule

For this example, we'll create a rule that is **capable of reading player input**. Start by creating a new structure and name it appropriately - lets say **FAiRulePlayerInput**:

<figure><img src="/files/Ead7Ltdy3BIsmCo5gu17" alt=""><figcaption></figcaption></figure>

For this rule, we want to keep track of the actions the player is executing. We can retrieve this from the [AC\_InputBuffer ](/components-managers/player-specific-components/input-buffer)component of the player. We will bind to the **OnInputBufferConsumed** delegate in the Input Buffer Component to detect when an action has been performed. You can do this anywhere you like, but for this example, we'll do it inside [AC\_AI\_BehaviorManager](/components-managers/ai-only-components/ai-behavior-manager)'s **SetTarget()** method:

<figure><img src="/files/X8tqV24aLxCyQCRVC983" alt=""><figcaption></figcaption></figure>

<figure><img src="/files/lt2pPkmlgk7hkOhIvPrq" alt=""><figcaption></figcaption></figure>

Now that we're keeping track of the recently triggered actions of the player, we can utilize this new property we created (**MostRecentPlayerActionInput**) on the [AC\_AI\_CombatManager](/components-managers/ai-only-components/ai-combat-manager)'s **EvaluateAbilityRule()** method:

<figure><img src="/files/5H0LKeqEQKo3AeFJLt9r" alt=""><figcaption></figcaption></figure>

Add the new rule to the AI ability you want to use:

<figure><img src="/files/1dLnNlgQokM8cJXh4cZS" alt=""><figcaption></figcaption></figure>

<figure><img src="/files/3xdNRJtr4eqOsqrhy2iX" alt=""><figcaption><p>Enemy will now dodge when player attacks!</p></figcaption></figure>


# Creating Cinematics

<figure><img src="/files/0zmUaD09i86xqWXTfuTo" alt=""><figcaption></figcaption></figure>

**Cinematics** in Soulslike Framework can be triggered/played using two methods:

1. By using the [Camera Sequence Notify (AN\_PlayCameraSequence)](/animation-notifies/miscellaneous/camera-sequence-notify) (can't be skipped)
2. By spawning a **B\_SequenceActor** (supports skipping)

You should use the **first** method if your cinematic is related to an animation - such as a *finisher/execution/special attack*.

You should use the **second** method if your cinematic is generic - such as *being related to a cutscene*. This method **allows cinematics to be skipped**.

### Creating Camera Animations for Executions

Start by adding a **B\_BaseCharacter** to an empty level, and reset its transform to 0,0,0.

<figure><img src="/files/hFDNcYi4SEJzYNx9qP96" alt=""><figcaption></figcaption></figure>

Create a new **Level Sequence**. Open it up and add this Actor to the track:

<figure><img src="/files/lr7n7qOOFqomfmku7A2A" alt=""><figcaption></figcaption></figure>

{% hint style="info" %}
You can get rid of the Transform & Control Rig (if you do not plan on using Control Rig) tracks.
{% endhint %}

**Right-click** the Actor track and open up the **Binding Tag Manager.**

<figure><img src="/files/8LYwrabT9eZbtv9ofRWv" alt=""><figcaption></figcaption></figure>

**Right-click** and add the **Player** binding tag:

{% hint style="warning" %}
The **Player** object binding is important in cases where we need to know the current transform data for the player. This is the case for cinematics that are being played through an animation (executions/finishers/special attacks/etc.)
{% endhint %}

<figure><img src="/files/g6ONmEeBzc1hqWbHJBNf" alt=""><figcaption></figcaption></figure>

Next, add your **execute/finisher animation** to the track:

<figure><img src="/files/EiwRZTQWt00j1E7u2LMt" alt=""><figcaption></figcaption></figure>

Add a **Camera Cut Track**:

<figure><img src="/files/ex9t2Pf2YXEwqB2BfONe" alt=""><figcaption></figcaption></figure>

Turn off **Constrain Aspect Ratio**, and turn on **Override Aspect Ratio Axis Constraint:**

<figure><img src="/files/3Zvm5dsejnYfjswtHtlu" alt=""><figcaption></figcaption></figure>

(Optional) Adjust other **Camera Settings** to your liking:

<figure><img src="/files/mX7W6OwiYKGVSo4MK0yy" alt=""><figcaption></figcaption></figure>

Create a camera animation. Animate the **Camera Transform** by adding keys to it (refer to the Unreal Engine documentation if you're not familiar with basic **Sequencer** usage):

<figure><img src="/files/YQeEM4g6JMLnWI3TNZUD" alt=""><figcaption></figcaption></figure>

Then, **right-click** the Camera Cuts track and enable **Can Blend.**

<figure><img src="/files/iWVvWIZPJpKwjvWeEJ7E" alt=""><figcaption></figcaption></figure>

Finally, add a reasonable amount of **Fade In / Fade Out** to the Camera Cuts using the sliders:

<figure><img src="/files/FZGqXX8sxJjsWS3telMR" alt=""><figcaption></figcaption></figure>

That's it. Since this cinematic will be playing **during an execution/finisher,** we can use the **first** **approach (Anim Notify)**:

<figure><img src="/files/Qdp51Oj32K0cPLcSddAA" alt=""><figcaption></figcaption></figure>

The result:

<figure><img src="/files/rypH9K0JbzAPVQgC9cg5" alt=""><figcaption></figcaption></figure>

### Creating Generic Cinematics

The process for creating generic cinematics is simpler.

Start by creating a new **Level Sequence** and building your cinematic. You can take a look at the provided cinematic sequences located in **/SoulslikeFramework/Cinematics**:

1. **LS\_ShowcaseRoom**
2. **LS\_Boss\_Start**
3. **LS\_Boss\_Death**

For easily playing your sequence and listening to its **OnFinished()** event, you can use the custom **B\_SequenceActor** class that is provided with Soulslike Framework:

<figure><img src="/files/A2FCpEJo2JTrAEejgTI8" alt=""><figcaption></figcaption></figure>

{% hint style="success" %}
From the player HUD (referenced inside the controller), you can switch the **Cinematic Mode** on/off before/after playing your cinematic.

**Cinematic Mode** disables the HUD, and shows only the **Skip** notification if any key is pressed (skipping cinematics is handled by the **B\_SequenceActor** class).
{% endhint %}


# Damaging & Combo's

*This category contains the notifies that can be utilized for **Combo Management & Damaging.***


# Register Attack Notify

ANS\_RegisterAttack

This is a **mandatory Animation Notify State** for the **Combo System**. This notify is used to control the Montage Section of the Combo.

When working with a **Combo Montage,** ensure that you add these notifies and adjust their **Queued Section** correctly:

<figure><img src="/files/2FlU6z5S20oiXYWUcnRu" alt=""><figcaption></figcaption></figure>

For more information, check out the [Creating New Attacks/Combo Montages page.](/getting-started/quickstart/setup-custom-montages#creating-new-attacks-combo-montages)


# Weapon Trace Notify

ANS\_WeaponTrace

Soulslike Framework provides an **Animation Notify State** for performing a weapon trace, which is tied to the [Weapon **Collision Manager**](/components-managers/shared-components/weapon-collision-manager). Simply add it to your montage and adjust its starting/ending points relevant to your attack. Ensure that you select the correct **TraceType (Right Hand/Left Hand/Both)** from the details panel by selecting your Notify:

<figure><img src="/files/0akIvyM1MbMVRy9qQ0EF" alt=""><figcaption></figcaption></figure>

{% embed url="<https://youtu.be/QVVZUCgGxjo>" %}

If you are having issues, ensure that you've setup your weapon correctly. [You can follow this page for more information on creating weapons.](/workflow/creating-and-editing-items/creating-and-editing-weapons#using-the-utility-tools-to-create-and-edit-weapons)


# AI Weapon Trace Notify

ANS\_AI\_WeaponTrace

This is the AI version of the **Weapon Trace Animation Notify State.** It is a simplified version which operates on the attached actor(s) (weapons) of the AI class. Simply add it to the AI's attack montages and adjust it for where the trace should happen:

<figure><img src="/files/mPk7aKp4Nu7IuihpeXhT" alt=""><figcaption></figcaption></figure>

{% embed url="<https://youtu.be/qyDk_fTDYBw>" %}


# Fist Trace Notify

ANS\_FistTrace

Soulslike Framework provides an **Animation Notify State** for performing an unarmed trace. Unarmed attacks are handled by the [Combat Manager](/components-managers/player-specific-components/combat-manager) unlike weapons.  To use this notify, simply add it to your montage and adjust its starting/ending points relevant to your attack. Ensure that you select the correct **TraceType (Right Hand/Left Hand/Both)** from the details panel by selecting your Notify:

<figure><img src="/files/a0fPFNvTWOBtKlFnAZbv" alt=""><figcaption></figcaption></figure>

{% embed url="<https://youtu.be/DKEIReRqlZo>" %}

If you are having issues, ensure that you've setup your **Combat Component** and related properties correctly. To learn more about **creating/editing Animsets**, [check this page out.](/workflow/creating-and-editing-items/creating-and-editing-weapons#creating-editing-weapon-movesets)

<figure><img src="/files/F8OGZeOtjS9xm9ZrbTyV" alt=""><figcaption></figcaption></figure>


# AI Fist Trace Notify

ANS\_AI\_FistTrace

This is the **AI** version of the **Fist Trace Notify.** Unarmed attacks for AI are handled by the [AI Combat Manager](/components-managers/ai-only-components/ai-combat-manager).  To use this notify, simply add it to your montage and adjust its starting/ending points relevant to your attack. Ensure that you select the correct **TraceType (Right Hand/Left Hand/Both)** from the details panel by selecting your Notify:

<figure><img src="/files/oqxb1ZOkx0XPnw8XIhOe" alt=""><figcaption></figcaption></figure>

If you are having issues, ensure that you've setup your Unarmed properties in the **AI Combat Manager** component correctly:

<figure><img src="/files/E7T9Fm7Pz8pEQdw0LWNy" alt=""><figcaption></figcaption></figure>


# Area of Effect Damage Notify

AN\_AoeDamage

This is an example notify that is not utilized in the demo but is there for you to use out the box. It does a basic sphere overlap for the desired Object Types/Classes with the desired radius, and applies a random damage from the Min/Max damage inputs.

<figure><img src="/files/zMQl5BMTvzaCQTSOvDU4" alt=""><figcaption></figcaption></figure>


# Spawn Projectile Notify

AN\_SpawnProjectile

This is a simple notify that can be used on **Player** animations to spawn a projectile at a specific time. It will spawn the provided projectile class at the target socket:

<figure><img src="/files/699IDoPfzko05XpbpRR8" alt=""><figcaption></figcaption></figure>


# AI Spawn Projectile Notify

AN\_AI\_SpawnProjectile

This is the **AI** version for the **Spawn Projectile** notify. The reason we have two differing notifies is because this version of the notify uses the **AI Behavior Manager** to retrieve the current target of the AI and setup homing properties for the projectile (if there's any):

<figure><img src="/files/kMKHdAFrMagWrHnBUywF" alt=""><figcaption></figcaption></figure>


# Defensive

*This category contains the notifies that can be utilized for **Defenses.***


# Try Guard Notify

AN\_TryGuard

Soulslike Framework provides an **Animation Notify** for **checking if player wants to guard.** This is particularly useful if the player is holding down the **Guard** action and decides to for e.g, do an Attack action. By default, the **Guard** action will be canceled and won't get re-activated after the Attack. With this notify, you can tell your montages to check for this and re-execute **Guard** action if player is still holding the **Guard** action.

{% hint style="danger" %}
This notify **must be placed after the Input Buffer notify** to work correctly.&#x20;
{% endhint %}

<figure><img src="/files/808VNMAE6gajatuYRffW" alt=""><figcaption></figcaption></figure>

{% embed url="<https://youtu.be/X4fmOoZ02DA>" %}


# Hyper Armor Notify

ANS\_HyperArmor

This is a shared notify that can be used within both the player and AI related animations. It will enable/disable **Hyper Armor.**

When Hyper Armor is active, the owner of the animation **cannot be interrupted.**

<figure><img src="/files/L9CynmR5aD5A6nmesjhU" alt=""><figcaption><p>If used within an AI related animation, <strong>ensure that you tick bIsAi</strong></p></figcaption></figure>


# Invincibility Frame Notify

ANS\_InvincibilityFrame

Soulslike Framework provides an **Animation Notify State** that can toggle the **invincibility** state of the player or AI. This notify is mostly added to the **dodging montages.** For more information, check out the [Creating/Editing Dodge Montages page](/getting-started/quickstart/setup-custom-montages#creating-new-dodging-rolling-montages).

<figure><img src="/files/glfz1hFLJfLdQrMOWcwo" alt=""><figcaption></figcaption></figure>

{% embed url="<https://youtu.be/NWhVKv9VuMk>" %}


# Feedback

*This category contains the notifies that can be utilized for **feedback.***


# Weapon Trail Notify

ANS\_Trail

Soulslike Framework provides a custom **Animation Notify State** differing from the default provided Trail notifies. This notify enables/disables the trail you add to your Weapon's world actor class. For more information, check out the [Creating/Editing Weapons page.](/workflow/creating-and-editing-items/creating-and-editing-weapons#using-the-utility-tools-to-create-and-edit-weapons)

<figure><img src="/files/49VEZ8XtVSUN9Ls85KxA" alt=""><figcaption></figcaption></figure>

{% embed url="<https://youtu.be/eMlYpiEBQVI>" %}


# AI Weapon Trail Notify

ANS\_AI\_Trail

This is the **AI** version of the **Trail Notify.** It will toggle on/off the trail system for the AI's weapon at the attached socket:

<figure><img src="/files/nEb4k0AYSrefcZR4wl8X" alt=""><figcaption></figcaption></figure>

<figure><img src="/files/Z9ziuzKXXGuBldkfn7Og" alt=""><figcaption></figcaption></figure>


# Camera Shake Notify

AN\_CameraShake

Soulslike Framework provides a generic **Animation Notify** for playing camera shakes. Simply adding this notify to your **Montage** and selecting a Camera Shake class is enough for it to work:

<figure><img src="/files/EIJSYnB4zMdVlQnuTT9o" alt=""><figcaption></figcaption></figure>

{% embed url="<https://youtu.be/9VzxKIG46OY>" %}


# World Camera Shake Notify

AN\_CameraShake

This is the **World** version of the **Camera Shake Notify**. It can be used to play camera shakes that affect all nearby local actors, with distance-based attenuation:

<figure><img src="/files/9XtS9Mf4yJAwqx2fGdAz" alt=""><figcaption></figcaption></figure>


# Launch Field Notify

AN\_LaunchField

This is an example Notify which utilizes the native **Character** class' **Launch Character** method. It uses a sphere overlap and applies the desired launch strength to the detected Characters using the **owner's forward vector.**

<figure><img src="/files/ahHNfKeNh0xgvG3xnGlw" alt=""><figcaption></figcaption></figure>


# Chaos Field Notify

ANS\_ToggleChaosField

This notify can be used to enable the **Field Actor** related to Chaos physics during specific parts of an animation to enable/disable Chaos physics interactions.

For example, take a look at the dodging montages:

<figure><img src="/files/OChEFVNrEpsAJDp41tFf" alt=""><figcaption></figcaption></figure>

During this period of the animation, if the player overlaps with a **Geometry Collection,** the overlapped actor will receive **External Strain** and break.&#x20;


# Footstep Notify

AN\_FootstepTrace

This notify is provided so that users can easily setup **physical material based SFX/VFX for footsteps**. By default, its only added to the **forward run animation.** You must add it to any other locomotion related animation that you'd like to have footsteps.

<figure><img src="/files/1ljuobLbgre5BvzGV9wK" alt=""><figcaption></figcaption></figure>

{% hint style="success" %}
After setting up all the physical materials and SFX/VFX, it is highly recommended to **copy and paste the notify** into **all necessary animations** to avoid remaking the necessary maps!
{% endhint %}


# Miscellaneous

*This category contains the notifies that can be utilized for **further polishing & better game feel**.*


# Input Buffer Notify

ANS\_InputBuffer

Soulslike Framework provides an **Animation Notify State** that communicates with the [Input Buffer Component](/components-managers/player-specific-components/input-buffer) and toggles its buffer. When triggered(started), it will disable all input detection (will queue one action). When finished(ended), it will re-enable input detection:

<figure><img src="/files/bFMezCtPMZPpl09ajxRv" alt=""><figcaption></figcaption></figure>

{% embed url="<https://youtu.be/pEdWI1DdBLA>" %}


# Interrupt Montage Notify

AN\_InterruptMontage

Soulslike Framework provides an **Animation Notify** for **breaking out of montages early** if the player is **trying to move** while the montage is being performed. Add this where you want the montage to be interrupted, and adjust the blending to your liking:

{% hint style="danger" %}
This notify **must be placed after the Input Buffer notify** to work correctly.&#x20;
{% endhint %}

<figure><img src="/files/GVra0zbqH9UXUhjscI9O" alt=""><figcaption></figcaption></figure>

{% embed url="<https://youtu.be/v_0WdLXHV-8>" %}


# Camera Sequence Notify

AN\_PlayCameraSequence

This notify can be used to **simply trigger camera sequences/animations from an animation**. It is used inside  the finisher/execution montage provided with the framework:

<figure><img src="/files/I2BVs9aGAzl9fyLEKn1Q" alt=""><figcaption></figcaption></figure>


# Set Movement Mode Notify

AN\_SetMovementMode

This notify can be used to adjust **Movement Mode's** of a **Character** that inherits from the **Soulslike Character** (B\_BaseCharacter) class.

**Movement Mode** consists of 3 states:

1. Walking
2. Running
3. Sprinting

The speeds related to these states are defined in the **Movement Speed Asset** that is assigned to the **Stat Manager** (AC\_StatManager) of each character:

<figure><img src="/files/xKkziit6ll9IdUGYOIBb" alt=""><figcaption></figcaption></figure>

You can easily duplicate this asset for each entity. Or you can share them as you desire.

<figure><img src="/files/zA4sAUjzkb1HqrmuLBp5" alt=""><figcaption></figcaption></figure>


# AI State Notify

AN\_SetAiState

This notify can be used to adjust the **"State"** of an AI character. It must be placed in an animation/montage which is used by an AI character that has the **AI Behavior Manager** (AC\_AI\_BehaviorManager) component.

<figure><img src="/files/fkaO1WdfkPkLJERWSxdq" alt=""><figcaption></figcaption></figure>


# AI Rotate Towards Target Notify

ANS\_AI\_RotateTowardsTarget

This is a notify which will only work on animations that are being used by a **Soulslike Enemy** (B\_Soulslike\_Enemy) class or a class that implements the **BPI\_Enemy** interface.

It is used to **control the rotation of the AI character mid-animation (root motion supported)** through a *generic rinterp/timeline based logic*. The length of the notify dictates the speed of the rotation.

{% hint style="success" %}
This is an example **optional** notify. If you are planning on using [**Motion Warping**](/extending-functionality/using-motion-warping) you can ignore this notify and just utilize that **MotionWarping** notify instead.
{% endhint %}

<figure><img src="/files/FpbWIznr3Xia4VGEvFPM" alt=""><figcaption></figcaption></figure>


# Adjust Stat Notify

AN\_AdjustStat

{% hint style="danger" %}
Adjusting **Stamina** through this notify **will cause conflict** with the **Action system.** Refrain from adjusting the Stamina stat through this notify.

Stamina consumption depends on the **Weapon Stamina Multiplier.** The base value of an action is multiplied by this multiplier:

![](/files/an0vK299EpZKlpY8XbKt)

For more information, check out [Creating & Editing Actions.](/workflow/editor)
{% endhint %}

Soulslike Framework provides an **Animation Notify** that can be used to adjust a stat directly from your montage:

<figure><img src="/files/yciA9AzVOAVwuFMWps6f" alt=""><figcaption></figcaption></figure>

{% embed url="<https://youtu.be/kfyMP-ajyqE>" %}
In the video, only the FP consumption is happening through the notify.
{% endembed %}


# Player Specific Components


# Input Buffer

<div align="left"><figure><img src="/files/bsEmrmpRMJDmnYbj9aCr" alt=""><figcaption></figcaption></figure></div>

The **Input Buffer Component (AC\_InputBuffer)** ensures smooth gameplay by queuing inputs when actions are unavailable (e.g., mid-animation). When the player inputs a new action while another is active, the system waits for the current action to finish before executing the queued action.

For e.g, Dodging is an action. Jumping is also an action. If we try to Jump while Dodging, we will only be able to Dodge when the buffer is closed:

{% embed url="<https://youtu.be/s6Yiv6cD-6c>" %}
In the video, the Jump action is being triggered simultaneously with the Dodge action. Since Dodge action is triggered first, Jump action is queued.
{% endembed %}

The component is added to the **Character** class by default **(B\_Soulslike\_Character).**

### **How it Works**

1. Player inputs an action (e.g., light attack).
2. If the player is already performing an action, the input is stored in the **AC\_InputBuffer**.
3. Once the current action completes (and the buffer is closed), the queued action is executed.

### Example Usages

#### Queueing an action:

<div align="center"><figure><img src="/files/8mrHdz4t0nA4gw61LMpc" alt=""><figcaption><p>Jump Action is queued.</p></figcaption></figure></div>

<figure><img src="/files/QI0lwVGft6Rue6tfPOK8" alt=""><figcaption><p>When buffer is consumed, action will be performed.</p></figcaption></figure>

The buffer windows are handled through the [ANS\_InputBuffer notify state.](/animation-notifies/miscellaneous/input-buffer-notify)


# Action Manager

<div align="left"><figure><img src="/files/3zZsAH0lcMZQ2lv5n5hy" alt=""><figcaption></figcaption></figure></div>

The **Action Manager (AC\_ActionManager)** is responsible for managing, tracking, and executing all player actions. At runtime, it spawns and initializes action objects, providing a centralized system to find and execute actions dynamically.

It is added to the **Character** class by default **(B\_Soulslike\_Character).**

### **How It Works**

1. **Action Registration**:
   * At runtime, all relevant Actions (e.g., Attack, Dodge, Jump, etc.) are registered and initialized as UObject-based instances.
   * Actions are stored in a map for quick lookup through the usage of Gameplay Tags.
2. **Performing Actions**:
   * When an action is requested (through the **Input Buffer**), the Action Manager looks up the incoming Action in its map.
   * Calls the `ExecuteAction()` method in the found action object, triggering the action's specific behavior.
3. **Action State Management**:

   * Ensures that only valid actions can execute (e.g., preventing a dodge during an attack unless queued).

   <figure><img src="/files/Yw8FiPz5X1PJxDb9kRt1" alt=""><figcaption></figcaption></figure>

### See Next: [How to Create/Edit Actions?](/workflow/editor)


# Combat Manager

<div align="left"><figure><img src="/files/SPfsFMUrLuoobqwxAWkq" alt=""><figcaption></figcaption></figure></div>

The **Combat Manager (AC\_CombatManager)** component is the core combat handler for the player, responsible for managing all aspects of player combat, including unarmed attacks, weapon attacks, guarding, poise system, combo chains, and damage application. It is the counterpart to [**AC\_AI\_CombatManager**](/components-managers/ai-only-components/ai-combat-manager), but tailored for a more interactive, **player-driven combat system.**

It is added to the **Character** class by default **(B\_Soulslike\_Character).**

### **How It Works**

1. **Initialization & Event Bindings**
   * When initialized , it binds to key events such as **OnAnyDamage** and **OnStatUpdated**.
   * It listens for stat changes to respond relatively&#x20;
     * For example, death event when Health <= 0, poise break when Poise <= 0, etc.
2. **Damage Handling**
   * Handles incoming damage from various sources (weapons, projectiles, unarmed).
   * Checks player invincibility and adjusts HP accordingly.
   * If the damage reduces HP to 0, it triggers the **HandleDeath()** function.
3. **Unarmed Combat & Hit Tracing**
   * Supports **tracing-based melee attacks** for unarmed combat using **hand sockets**.
   * Tracks traced actors in **FistTracedActors** and processes hit reactions accordingly.
4. **Guarding & Perfect Guard System**
   * Implements a **guard system** with tracking for active guard state, stamina drain, and **perfect guard mechanics**.
   * **Perfect Guard** window is based on **PerfectGuardDuration** and **FacingDirectionAcceptance**.
   * If a perfect guard is executed, an effect is played (**PerfectGuardEffect**) and the incoming damage is completely ignored.
5. **Combo System**
   * Tracks combo sections through **ComboSection** and executes **Montages** dynamically.
6. **Poise System**
   * Tracks the player's **Poise** stat.
   * If poise is broken, plays a **Poise Break Montage** which is used to punish the player.
7. **Hit Reactions**
   * Upon taking damage, after relative stats have been adjusted, tries to play a directional hit reaction **only if the player's Stance stat <= 0** (stagger resistance)**.**
8. **Death & Respawning Logic**
   * Clears lock-on and clears the guard state.
   * Determines the **direction of death** and plays appropriate **ragdoll/death montage**.
   * Drops currency at the death location.
   * Initiates **respawning logic**.

### Example Usage

<figure><img src="/files/TM9EKCQWlPqfYgDGYNFf" alt=""><figcaption></figcaption></figure>


# Interaction Manager

<div align="left"><figure><img src="/files/Pxb9F1D6r6SRb7Q5t5rd" alt=""><figcaption></figcaption></figure></div>

The **Interaction Manager (AC\_InteractionManager)** handles interactions between the player and nearby interactables. It also manages target locking and target switching for combat.

It is added to the **Character** class by default **(B\_Soulslike\_Character).**

### **How It Works**

1. **Detecting Interactables**:
   * Continuously (on a reasonable interval) traces nearby **Interactable** objects.&#x20;
   * Maintains a list of detected objects and shows the interaction widget for the closest object.
2. **Target Locking**:
   * Upon request, tries to locks onto the nearest valid **Enemy** target and updates the camera and player orientation accordingly.
3. **Target Switching**:
   * Allows switching between nearby targets based on input (e.g., cycling through enemies during combat).
   * Ensures smooth transitions with minimal disruption to gameplay.

### Example Usage

<figure><img src="/files/fRGJF74J14jkxtx5XycB" alt=""><figcaption></figcaption></figure>

<figure><img src="/files/Y2zbWacQdDFOM3X7OkKs" alt=""><figcaption><p>Tracing for Interactables</p></figcaption></figure>

<figure><img src="/files/MPZxMhYqPmEjU77SykDL" alt=""><figcaption><p>Target Locking related traces</p></figcaption></figure>


# Inventory Manager

<div align="left"><figure><img src="/files/Pxb9F1D6r6SRb7Q5t5rd" alt=""><figcaption></figcaption></figure></div>

The **Inventory Manager (AC\_InventoryManager)** provides all the necessary functionality to handle player Inventory & Storage, including adding, removing, and using items, managing currency, and updating the UI in runtime.

It is added to the **PlayerController** class by default **(PC\_SoulslikeFramework).**

### **How It Works**

1. **Initialization**:
   * Initializes all item slots and prepares the inventory UI for use.
   * `InitializeLoadedInventory` method tries to load inventory data from the relevant save slot.
2. **Item Handling**:
   * **Adding Items**: Items can be added through the relevant item asset or a Gameplay Tag.&#x20;
     * Automatically increments quantity if the item already exists, or creates a new slot if it doesn’t.
   * **Removing Items**: Removes a specific quantity or deletes the item from the inventory entirely.
   * **Using Items**: Triggers the item’s `OnUse` function, spawning the appropriate actor (e.g., potion, consumable) and applying effects.
   * **Triggering Actions:** Triggers the item's provided `ActionTag`, queueing it through the Input Buffer.
3. **Inventory Queries**:
   * Supports multiple ways to query inventory data:
     * **HasItem**: Checks if a specific item is present.
     * **GetAmountOfItemWithTag**: Retrieves the quantity of items matching a specific tag.
     * **GetEmptySlot**: Finds the next available empty inventory slot.
4. **UI Updates**:
   * Event dispatchers such as `OnInventoryUpdated` and `OnCurrencyUpdated` ensure the inventory UI is always in sync with changes.
   * The `GetInventoryWidget` function links the UI directly to the inventory component.
5. **Saving/Loading**:
   * The `SaveAllInventory` function serializes the inventory state, including items, quantities, and configurations.
   * Inventory data is restored on load using the `InitializeLoadedInventory` function.

### Example Usages

The provided **Parent Door Class (B\_Door)** has a great example on utilizing the Inventory Manager for checking if **multiple key items** (e.g, KeyA x1 & KeyB x4) exist in inventory before unlocking a door:

<figure><img src="/files/RITZGNhQONyKO3m6KjWb" alt=""><figcaption></figcaption></figure>

Rest of the functionality is mainly handled by **Inventory Widget.**


# Equipment Manager

<div align="left"><figure><img src="/files/Pxb9F1D6r6SRb7Q5t5rd" alt=""><figcaption></figcaption></figure></div>

The **Equipment Manager (AC\_EquipmentManager)** is one of the most sophisticated components in Soulslike Framework, responsible for dynamically managing equipment slots and their associated functionality. It provides a fully modular and customizable equipment system, allowing users to define and configure slots at runtime.

It is added to the **PlayerController** class by default **(PC\_SoulslikeFramework).**

### **How It Works**

* **Slot Initialization**:
  * At runtime, equipment slots are generated using the provided Slot Tabl&#x65;**.**
  * Each slot is assigned a unique identifier and type (e.g., `Right Hand Weapon 1`, `Tool Slot 3`), allowing the system to handle them flexibly.
* **Equipping Items**:
  * The `EquipItem` method validates whether the item meets slot requirements:
    * **Stat Requirements**: Checks if the player has the required stats for the item.
    * **Slot Compatibility**: Ensures the item can be equipped to the intended slot type.
  * Upon successful validation, the item is equipped, triggering:
    * **Stat Changes**: Applies any bonuses provided by the item (e.g., Strength +5).
    * **Visual Updates:** Weapons/mesh updates reflecting the equipped item.
    * **UI Updates**: Refreshes the equipment screen to reflect the new item.
* **Unequipping Items**:
  * The `UnequipItem` method removes the item from the slot, reversing any applied stat changes, visual changes and updating the UI.
* **Two-Hand Stancing**:
  * Toggles between one-handed and two-handed modes for weapons that support it (e.g., switching a sword from single-hand to two-hand grip).
  * Adjusts animations and gameplay logic accordingly.
* **Helper Methods**:
  * Includes various utility functions to streamline equipment management:
    * `IsSlotOccupied`: Checks if a slot currently has an item.
    * `GetActiveWeaponSlot`: Retrieves the currently active weapon for combat.
    * `CanBlock`: Determines if the equipped item allows blocking functionality.

### Example Usages

<figure><img src="/files/HPBxUk13LTjqwg5J8JUH" alt=""><figcaption></figcaption></figure>

<figure><img src="/files/xmPDdOoLhqZdSoqc17Vy" alt=""><figcaption></figcaption></figure>

Most functionality of the Equipment Component is utilized by the **Equipment Widget.**


# Ladder Manager

<div align="left"><figure><img src="/files/P7SrYbuEtd8dGRQFg26x" alt=""><figcaption></figcaption></figure></div>

The **Ladder Manager (AC\_LadderManager)** is an  optimized, animation-driven component responsible for handling ladder climbing states and ensuring smooth, root motion based traversal mechanics. It manages player conditions while climbing and provides animation state updates based on movement input.

It is added to the **Character** class by default **(B\_Soulslike\_Character).**

The Ladder Manager component has a **LadderAnimset** asset which contains all climbing related montages (climb up/down, climb out from top/climb in from top). This can be replaced/modified to define custom animations for different characters

<figure><img src="/files/4r16lGJXIcCCULNUzRpW" alt=""><figcaption></figcaption></figure>

Additionally, provided with the framework is also a **fully procedural ladder actor (B\_Ladder).** You can create a ladder of any size and adjust it to your liking.

{% hint style="danger" %}
Please note that the **provided ladder animations** in the framework **have been altered/adjusted with the Control Rig** to be *compatible with the default settings for the ladder actor.*
{% endhint %}

<figure><img src="/files/7U7TyPc8xr0DbBnoaP77" alt=""><figcaption></figcaption></figure>

### **How It Works**

* When **interacted:** Rotates/lerps player to the correct world position & updates the **IsOrientedToLadder** flag accordingly.
* When **climbing:** Adjusts player movement mode to **Flying, s**tops movement immediately, disables rotation, adjusts braking deceleration and notifies the **Action Manager** that the player is currently on a ladder to avoid queueing of actions in the **Input Buffer**.
* When **climbing off the ladder:** Stops climbing state, plays out the related montage, switches movement mode back to **Walking/Custom.**
* When **climbing down from the top:** Ensures that the player is NOT already climbing, plays the related montage and transitions the character back into climbing mode.
* If player **sprints while climbing:** Applies a multiplier to the related animation's play rate, allowing the player to climb up/down faster.

<figure><img src="/files/GLdjSXRoth0LvMyxJQrK" alt=""><figcaption></figcaption></figure>


# Progress Manager

<div align="left"><figure><img src="/files/P7SrYbuEtd8dGRQFg26x" alt=""><figcaption></figcaption></figure></div>

The **Progress Manager (AC\_ProgressManager)** is a simple yet powerful component that tracks player progress using a **Gameplay Tag | EProgress** map. It integrates seamlessly with the [**AI Interaction Manager** component](/components-managers/ai-only-components/ai-interaction-manager), allowing dialogues to dynamically adjust based on the player's progress. Additionally, it includes a **Gameplay Event System** that can be triggered from AI dialogues or other gameplay events.

It is added to the **PlayerController** class by default **(PC\_SoulslikeFramework).**

### **How It Works**

* **Storing & Managing Progress**
  * The component maintains a **map of Progress Tags | EProgress**. Each progress state is stored persistently, allowing the system to track **which objectives, quests, or interactions** have been completed.
* #### **Adjusting Progress States**
  * `SetProgress(ProgressTag, EProgressState)`
    * Updates the current progress of a given tag.
  * `GetProgress(ProgressTag)`
    * Returns the **current progress state** of a given tag.
* **Executing Gameplay Events**
  * **`ExecuteGameplayEvents(EventsArray)`**
    * This function processes a struct (`FDialogGameplayEvent`), which contains:
      * `EventTag`: Identifies what type of gameplay event it is.
      * `AdditionalTag`: Provides extra context for event handling.
      * `Custom Data`: A flexible **Instanced Struct** that can store **any type of data** dynamically.
    * When triggered, iterates through the **array of events**, extracting necessary data and routing them accordingly.
    * Using a switch statement, determines the **type of event**, executing the desired logic according to event tag.

### Example Usage

<figure><img src="/files/8XSqzhVgIHABk62WN3G8" alt=""><figcaption></figcaption></figure>

### Example Usage with the NPC Dialogues

<figure><img src="/files/MYnpsfd81uYm65bw9kx5" alt=""><figcaption></figcaption></figure>

### Example on Triggering Gameplay Events through Dialogue Tables

<figure><img src="/files/F0uHeXLRZk7aW3LFWiTu" alt=""><figcaption></figcaption></figure>


# Save/Load Manager

<div align="left"><figure><img src="/files/Pxb9F1D6r6SRb7Q5t5rd" alt=""><figcaption></figcaption></figure></div>

The **Save/Load Manager(AC\_SaveLoadManager)** is a highly versatile component designed to manage all saving and loading operations. It tracks saved data, interacts with the selected save slot stored in the **Game Instance**, and uses **FInstancedStructs** to handle diverse data types. This ensures modularity and flexibility, allowing any type of game data to be saved or loaded seamlessly.

It is added to the **PlayerController** class by default **(PC\_SoulslikeFramework).**

### Functionality

* Works with the **Game Instance** to determine which save slot to handle.
* Utilizes **FInstancedStruct** to save and load any type of data (e.g., stats, inventory, equipment, world state).
  * Converts data into serialized structures for storage and retrieval.
* **Dynamic Save/Load Functionality**:
  * Saves game data dynamically based on the active save slot.
* **Event-Driven Updates**:
  * Dispatches events to notify other components or systems when data is loaded.

### **How It Works**

Main method - **Event UpdateSaveData:** Utilized to add/update our save data. Any type of data can be stored/retrieved in the save file thanks to **Instanced Structures:**

<figure><img src="/files/ZST9zzR3DE1oxSXLZ5hY" alt=""><figcaption></figcaption></figure>

Additionally, helper method - **Event AddToSaveData:** Used to add new data to an existing data entry:

<figure><img src="/files/pCRK5AQzS8WGBTVmeDIm" alt=""><figcaption></figcaption></figure>

These events are triggered from various blueprints. If you'd like to see where, see our page related to [Finding References](/getting-started/finding-references).

### Saving Components

Each component has a method of "serializing" their data into a savable structure format:

<figure><img src="/files/o4cYWcOE09DIhujRAwb9" alt=""><figcaption><p>Example from AC_EquipmentManager</p></figcaption></figure>

This method adds the related save data to the main data we have in our save/load component. Each component that has data that needs to be saved implements a similar method.&#x20;

Additionally, **AC\_SaveLoadManager** has methods for serializing all of the components.

When the save data inside **AC\_SaveLoadManager** is updated, data will be saved into file.

### Loading Components

The save/load manager sends a message which **each component that requires loading** listens to:

<figure><img src="/files/kkJXerwIFMhpKdW3ANfY" alt=""><figcaption></figcaption></figure>

When this dispatcher is called, each component that is listening to it will execute a relevant method:

<figure><img src="/files/Uu4huey1u2Zwofcdfdip" alt=""><figcaption><p>Example from AC_InventoryManager</p></figcaption></figure>

### Saving World Actors (Interactables & NPC's)

Actors that need to be saved require a unique identifier. For this, we utilize **GUID's** in Soulslike Framework. Actors without a valid GUID won't be considered for saving:

<figure><img src="/files/i97smrWWjn1Tk3C101yN" alt=""><figcaption></figcaption></figure>

For example, when this container actor (B\_Container) is interacted with, it calls a method to update our save data:

<figure><img src="/files/cjgYZOgLnk4peXlUuPhV" alt=""><figcaption><p>Method screenshot from B_Interactable</p></figcaption></figure>

After our save data has changed/updated, it gets serialized and saved automatically into a file.

### Loading World Actors (Pickup Items, Interactables, NPC's)

Similarly, actors that require loading bind to AC\_SaveLoadManager's **OnDataLoaded()** delegate. This way, when data is loaded, we can execute any desired logic.

<figure><img src="/files/UQ4dDCrXrmBrWTfUcuK1" alt=""><figcaption><p>Load event from B_Interactable</p></figcaption></figure>


# Radar & Radar Element Components

<div align="left"><figure><img src="/files/Pxb9F1D6r6SRb7Q5t5rd" alt=""><figcaption></figcaption></figure></div>

The **AC\_RadarManager** is a component responsible for managing the **Radar/Compass UI** in the framework. It tracks cardinal directions, player orientation, and important tracked elements dynamically. The system updates based on camera movement, ensuring efficient and optimized performance.

It is added to the **PlayerController** class by default **(PC\_SoulslikeFramework).**

### **How It Works**

* **Initialization**
  * The `Initialize` function sets up all necessary properties such as the UI element, provided cardinal entries & the player icon.
* **Interval Based Updates & Optimization**
  * The **Update Timer** is controlled by `SetupUpdateTimer()`, which p**auses updates** when necessary.
* #### **Cardinal & Element Tracking**
  * The **`RefreshCardinals`** function adjusts the position of the provided cardinal letters based on the camera rotation using calculation methods to ensure correct alignment.
* **Tracked Elements (`RefreshTrackedElements()`)**
  * Dynamically updates tracked icons (e.g., quest markers).
  * Uses `TrackedComponents[]` to store active elements.
  * Icons **clamp at a fixed radar range**, preventing off-screen distortion.

### Example Usage

<figure><img src="/files/DMNOB8jU0ESMAA9yCEoG" alt=""><figcaption></figcaption></figure>


# Central Debug Component

<div align="left"><figure><img src="/files/Pxb9F1D6r6SRb7Q5t5rd" alt=""><figcaption></figcaption></figure></div>

The **Debug Central (AC\_DebugCentral)** component is a powerful debugging utility designed to **monitor, log, and display** real-time information about all key components of the framework. It collects data from every major component and feeds it into the **W\_DebugWindow widget**, which handles parsing and formatting the data for display in the UI.

It is added to the **Character** class by default **(B\_Soulslike\_Character).**

### **How It Works**

* #### **Initialization & Component Collection**
  * Allows a generous time for all components to be initialized before initializing itself.
  * **Collects references** to all relevant gameplay components, ensuring the debug panel has access to the latest state of the game.
* **Debug Toggle & Tick Event Handling**
  * On **Begin Play**, the system checks if debugging is enabled (`EnableDebugging` flag) and accordingly **activates/deactivates ticking** and updates data at a regular interval.
* #### **Parsing & Formatting Debug Data**
  * The `UpdateComponentData()` method inside **W\_DebugWindow** is responsible for **querying each component** and converting its data into **a structured log entry**.
  * Uses a **Gameplay Tag Switch** to determine which component’s data is currently needed.
  * Parses relevant properties into a readable string for display.

### Example Usage

<figure><img src="/files/X8YIoaS9Dbxn7if5iLJE" alt=""><figcaption></figcaption></figure>

### Example From W\_DebugWindow

<figure><img src="/files/sWhKlDLtyYPs84f124KJ" alt=""><figcaption></figcaption></figure>


# Shared Components


# Stat/Attribute Manager

<div align="left"><figure><img src="/files/Pxb9F1D6r6SRb7Q5t5rd" alt=""><figcaption></figcaption></figure></div>

The **Stat Manager (AC\_StatManager)** is responsible for managing all stats and attributes in the project, both for player and AI. It works similarly to the Action Manager by instantiating each stat as a UObject at runtime, based on either a provided map or a data table. This component is designed to be **data-oriented** and **event-driven**, ensuring real-time responsiveness and integration with other systems.

It is added to the **Base Character** class by default **(B\_Base\_Character).**

### **How It Works**

1. **Stat Initialization**:
   * At startup, the **AC\_StatManager**:
     * Loads stats from the provided **data table** or **Stats\[] map**.
     * Creates an instance of each stat as a UObject for modular and extensible management.
   * The player's class asset provides base values for the attributes.
2. **Stat Tracking**:
   * Maintains a centralized map of stat instances, allowing quick retrieval through Gameplay Tags.
3. **Stat Modification**:
   * Provides methods to:
     * Increment or decrement a stat by a given value (e.g., apply damage, buffs).
     * Query the current or base value of a stat.
     * Level up the player.
4. **Event Dispatching**:
   * Changes to stat values automatically trigger event dispatchers, which are typically listened to by:
     * **UI Widgets** (e.g., updating health bars, stamina meters).
     * **Other Components** (e.g., triggering status effects or activating abilities).

### Adjusting Which Stats/Attributes to Initialize

The Stats/Attributes a character will have depends on what the Stat Manager is provided. Stats can be provided through a data table or through the Stats\[] map in **AC\_StatManager:**

<figure><img src="/files/scvKizKUowv5uJ9IOVxG" alt=""><figcaption></figcaption></figure>

### Example Usages

#### Adjust Stats:

<figure><img src="/files/4MNxXjRDzYFY9b01nCLa" alt=""><figcaption><p>Will adjust "MyPrimaryStat"'s Current Value by +1 and level up the player. </p></figcaption></figure>

#### Find/Get Stats:

<figure><img src="/files/ikycVNJ4Z3AhQf6dyW8c" alt=""><figcaption><p>GetStat() will return the Stat/Attribute Object, as well as the Stat Info struct.</p></figcaption></figure>

#### Toggle Regeneration for Compatible Stats/Attributes:

<figure><img src="/files/3VBdsmf4RYm9NsZOCHwp" alt=""><figcaption><p>Will try to Toggle Regeneration on the Stat Object with the provided tag.</p></figcaption></figure>

#### Adjust Player Level Manually

Player level is handled automatically through attribute increase from the Campfire. However, you can also manually increase/decrease level using the Stat Manager.

<figure><img src="/files/7jHDqT9Umxqmo82xgfK6" alt=""><figcaption><p>Will increase player level by 1.</p></figcaption></figure>

#### Compare Stat to a Threshold Value

<figure><img src="/files/fhu2xWNDOjXUPNHfmPJ5" alt=""><figcaption><p>Will check if Stamina is ≥ 25.0f.</p></figcaption></figure>

### See Next: [**How to Create/Edit Stats/Attributes?**](/workflow/editor-1)


# Status Effect Manager

<div align="left"><figure><img src="/files/Pxb9F1D6r6SRb7Q5t5rd" alt=""><figcaption></figcaption></figure></div>

The **Status Effect Manager (AC\_StatusEffectManager)** is a lightweight yet essential component responsible for managing status effects in the project, for both player and AI. It provides functionality to add, track, and manage the buildup and decay of status effects, ensuring seamless integration with gameplay mechanics.

It is added to the **Base Character** class by default **(B\_Base\_Character).**

### **How It Works**

1. **Adding Status Effects**:
   * Status effects can be added dynamically via multiple methods:
     * `TryAddStatusEffect`
     * `StartBuildup`
     * `AddOneShotBuildup`
   * When added, the manager checks if the effect is already active:
     * **If Active**: Won't re-instantiate the effect.
     * **If New**: Will insantiate the relevant UObject for the status effect and start tracking it.
2. **Tracking Active Effects**:
   * Keeps a map of active status effects for quick lookup.
3. **Buildup and Decay**:
   * Buildup mechanics allow effects to accumulate gradually over time (e.g., poison buildup from multiple hits).
   * Once the buildup threshold is reached, the effect activates fully.
   * Effects automatically decay or are removed based on their duration or external triggers.

### Example Usages

**B\_StatusEffectArea & B\_StatusEffectOneShot** are great example actors that demonstrate how the Status Effect Manager component can be utilized.

<figure><img src="/files/rdlUadumubn2qD7qeDvd" alt=""><figcaption></figcaption></figure>

#### Start/Stop Buildup:

<figure><img src="/files/YrquS2B4MQ24SL4E10pT" alt=""><figcaption></figcaption></figure>

#### Add One Shot Buildup:

<figure><img src="/files/WpPt6hcKaOLmmYWyOSca" alt=""><figcaption></figcaption></figure>

{% hint style="success" %}
Both of these functions will call `TryAddStatusEffect` if the target Status Effect is not active. So it almost never has to be called manually.
{% endhint %}

### See Next: [How to Create/Edit Status Effects?](/workflow/creating-and-editing-status-effects)


# Weapon Collision Manager

<div align="left"><figure><img src="/files/Pxb9F1D6r6SRb7Q5t5rd" alt=""><figcaption></figcaption></figure></div>

The **Weapon Collision Manager (AC\_CollisionManager)** is a component that dynamically handles collision tracing, hit detection, and damage processing for weapons. Tracing is enabled or disabled at runtime through the [**Weapon Trace Notify**](/animation-notifies/damaging-and-combos/weapon-trace-notify), ensuring collision checks occur only during specific animation frames.

It is added to the **parent Weapon Item** Actor class by default **(B\_Item\_Weapon).**

### **How It Works**

1. **Initialization**:
   * On `BeginPlay`, the component:
     * Reads the **Trace Sockets** for the start and end positions of the weapon trace.
     * Configures **Trace Radius** and **Trace Types**.
     * Sets up the tracing logic but keeps it **paused by default**.
2. **Animation Notify State (ANS\_WeaponTrace)**:
   * **ANS\_WeaponTrace** is used within weapon animations (e.g., attack swings) to toggle tracing:
     * **Enable**: Starts weapon tracing by unpausing the Event Tick.
     * **Disable**: Pauses weapon tracing to stop unnecessary checks.
3. **Collision Tracing (On Event Tick)**:
   * When tracing is enabled:
     * Performs a **Multi-Sphere Trace** using the socket positions and substepping to combat framerate dependency.
     * If a valid target is detected, the **OnActorTraced** event fires, passing hit data for processing.
4. **Damage and Effects**:
   * The `OnActorTraced` logic handles:
     * **Damage Calculation**: Uses weapon stats and modifiers (e.g., scaling, random variance).
     * **Damage Application**: Applies point damage to the hit target.
     * **Visual Feedback**: Spawns effects like blood splatters or sparks at the impact point.
     * **Audio Feedback**: Plays sound effects for weapon hits.
5. **Debugging**:
   * The **Trace Debug Mode** visualizes traces in real-time, helping developers fine-tune trace positions and radii.

### Example Usage

<figure><img src="/files/MjOYxT2wXK4aQ8LThqpU" alt=""><figcaption></figcaption></figure>


# Buff Manager

<div align="left"><figure><img src="/files/Pxb9F1D6r6SRb7Q5t5rd" alt=""><figcaption></figcaption></figure></div>

The **Buff Manager (AC\_BuffManager)** component is responsible for managing buffs that can be applied to the player, typically gained from items or triggered gameplay events. Unlike the **AC\_StatusEffectManager**, which tracks status effects like poison or burning, buffs are generally positive or neutral enhancements such as temporary stat boosts, increased movement speed, or resistance effects.

This component ensures that buffs are correctly applied & removed, preventing issues such as duplication or persistence after loading from save data.

It is added to the **Base Character** class by default **(B\_Base\_Character).**

### How It Works

* **Adding Buffs**
  * When an item grants a buff, the **TryAddBuff()** method is called. This method loads and creates an instance for the **Buff Object.** It ensures that effect duplication does not happen while loading from a save.
* **Removing Buffs**
  * Buffs can be removed through various functions:
    * **RemoveBuffOfType()** → Removes a single buff of a specified type.
    * **RemoveAllBuffsOfType()** → Removes all active buffs of a given type.
    * **RemoveBuffWithTag()** → Removes a buff using a gameplay tag reference.
    * **RemoveAllBuffsWithTag()** → Removes all instances of the buffs associated with a gameplay tag.
  * Buffs are removed either immediately or through a **delayed removal system**. The delayed method ensures that no race conditions occur.
* **UI & Widget Integration**
  * Whenever a buff is added or removed, the **OnBuffDetected** dispatcher fires, allowing connected UI elements (e.g., buff icons) to update accordingly.

### Example Usage

<figure><img src="/files/zr5naUiIOckF7JxRNVUF" alt=""><figcaption></figcaption></figure>

<figure><img src="/files/cmoNqxVAX5NxnrFYLoLi" alt=""><figcaption></figcaption></figure>

<figure><img src="/files/Af9hFqdpHV7kWTfB4Y5n" alt=""><figcaption></figcaption></figure>


# Loot Drop Manager

<div align="left"><figure><img src="/files/Pxb9F1D6r6SRb7Q5t5rd" alt=""><figcaption></figcaption></figure></div>

The **Loot Drop Manager (AC\_LootDropManager)** component is a lightweight loot selector which can be used to determine which item should be dropped based on a **weighted loot table** while also allowing for **manual item overrides** when necessary.

It can be attached to any enemy, container, or interactable object. It is added to the **Soulslike Enemy (B\_Soulslike Enemy) & Base Container (B\_Container) classes.**

### How it Works

* **Loot Table Configuration:**
  * The system uses a **Data Table** (Loot Table) that contains a list of potential item drops along with their **weight scores**.
  * The weights determine the probability of an item being selected when a drop is triggered.
* **Loot Selection Process:**
  * When the **PickItem** event is called, the system:
    * Retrieves and asynchronously loads the assigned **Loot Table** asset. Then iterates through the table and selects an item based on its weight score.
    * If an **Override Item** is assigned, the system will select that item instead.
* **Spawning & Dispatching:**
  * Once the selection is complete, the chosen item is sent through the **OnItemReadyForSpawn** dispatcher, making it available for world spawning.

### Example Usage

<figure><img src="/files/cVkK6v8WzeZGh4i0JeH2" alt=""><figcaption><p>Example from the <strong>Soulslike Enemy (B_Soulslike_Enemy) class</strong></p></figcaption></figure>


# AI-Only Components


# AI Interaction Manager

<div align="left"><figure><img src="/files/Pxb9F1D6r6SRb7Q5t5rd" alt=""><figcaption></figcaption></figure></div>

The **AI Interaction Manager (AC\_AI\_InteractionManager)** is responsible for handling NPC interactions, primarily focusing on **dialogue and vendor** logic. It determines **which dialogue should be displayed based on the player's progress** and displays the associated dialog entry upon interaction. Additionally, it allows NPCs to function as vendors, providing a seamless transition from dialogue into a shop or trade interface.

It is added to the **Soulslike NPC (B\_Soulslike\_NPC)** class by default.

### **How it Works**

* **Dialogue Handling**
  * Upon interaction with an NPC, the `BeginDialog` method is triggered. It ensures that a reference to the player's **Progress Manager** and the NPC’s **Dialog Asset** is valid before proceeding.
  * It fetches the appropriate **Dialog Table** based on the player’s progress and resets the **dialog index** to 0.
  * The dialog index is adjusted accordingly, either moving to the next line or exiting the conversation.
  * If the player **exits mid-dialog**, the system ensures that the dialog index is adjusted appropriately *(so that entries that execute gameplay events cannot be re-triggered).*
* **Executing Gameplay Events**
  * If the current dialog entry has an **event**, it triggers it via[ **AC\_ProgressManager**](/components-managers/player-specific-components/progress-manager) **-> ExecuteGameplayEvent()**.
* **Vendor Handling**
  * Upon completing the **last dialog entry**, the system checks if the NPC has an associated **vendor asset**.
  * If a vendor asset is found, the **NPC Window** is set up, transitioning the player into the vendor/shop interface.
  * If no vendor asset is present, the conversation simply ends.

### Example Usage

<figure><img src="/files/FQUeCTu8fbIkHUUqnqqc" alt=""><figcaption></figcaption></figure>

<figure><img src="/files/85ET2b2EbHI7N76fja73" alt=""><figcaption></figcaption></figure>

<figure><img src="/files/W0EdwSusFyEY5Zs2IKpd" alt=""><figcaption></figcaption></figure>


# AI Behavior Manager

<div align="left"><figure><img src="/files/Pxb9F1D6r6SRb7Q5t5rd" alt=""><figcaption></figcaption></figure></div>

The **AI Behavior Manager (AC\_AI\_BehaviorManager)** component is responsible for managing AI states (such as Idle, Patrolling, Random Roam, Investigating, Combat, etc.), ensuring smooth transitions between them. Additionally, the component allows for **fine-tuning** AI behavior through various **configurable parameters**.

It is added to the **Soulslike Enemy (B\_Soulslike\_Enemy)** class by default.

### **How It Works**

* **Behavior Tree Initialization**
  * On **Begin Play**, the component checks if the AI has a valid **Behavior Tree** assigned.
  * If a **Patrol Path** is present, the AI starts in a **Patrolling** state immediately.
  * Otherwise, it defaults to the **Idle** state.
* **State Management**
  * The component dynamically adjusts the AI's **state** based on environmental triggers (e.g., detecting the player, being attacked).
  * State changes are handled through the **SetState** method, ensuring smooth transitions between behaviors.
* **Fine-Tuning AI Behavior**
  * The following parameters allow for **custom AI tuning**:
    * **MaxChaseDistanceThreshold:** Maximum distance AI will chase a target before stopping.
    * **AttackDistanceThreshold:** The distance at which AI will initiate an attack.
    * **StrafeDistanceThreshold:** Controls how far the AI must be from its target for strafing.
    * **SpeedAdjustDistanceThreshold:** Adjusts AI movement speed based on distance to the target.
    * **MinimumStrafePointDistance:** The minimum distance for strafing logic.
    * **StrafeMethods:** Defines how AI will strafe (e.g., directional preferences).
* **Event Based Blackboard Updates**
  * The component is responsible for **adjusting Blackboard values** to ensure the AI’s **Behavior Tree** reacts correctly to its state.
* **Target & Patrol Tracking**
  * The **SetTarget()** function updates AI’s **current target** (e.g., player or other AI).
  * The **SetPatrolPath()** function assigns a patrol route.

### Example Usage

<figure><img src="/files/pBgzU24geJiLXpuNgaig" alt=""><figcaption></figcaption></figure>


# AI Combat Manager

<div align="left"><figure><img src="/files/Pxb9F1D6r6SRb7Q5t5rd" alt=""><figcaption></figcaption></figure></div>

The **AI Combat Manager** (**AC\_AI\_CombatManager)** component is responsible for handling AI combat interactions, including damage processing, hit reactions, poise/stance breaks, unarmed combat, and death handling. It functions *similarly* to the [**Combat Manager** used for the player](/components-managers/player-specific-components/combat-manager) but is specifically designed for AI, ensuring that AI enemies can react to incoming attacks, process damage correctly, and execute appropriate combat behaviors.

It is added to the **Soulslike Enemy (B\_Soulslike\_Enemy)** class by default.

### **How It Works**

* **Event Bindings**
  * **Registers AI combat events**, such as `OnTakeDamage` and `OnStatUpdated`, to ensure AI responds dynamically to combat situations.
* **Ability Selection**
  * The `TryGetAbility` method (called from **BTS\_TryGetAbility**) is used to retrieve a possible attack Ability while the AI is in Combat state.
* **Damage Handling**
  * **Listens for incoming damage events** and adjusts HP accordingly. If HP falls to zero, it triggers the death logic.
* **Poise System**
  * **Listens for poise stat changes & manages poise mechanics,** triggering a stagger/stun when poise is broken (if Poise falls to zero)
* **Stance Breaks & Hit Reactions**
  * Upon taking damage, the `HandleHitReaction` method checks if Stance is broken, if so, determines the correct hit reaction animation and applies knockback forces based on damage impact.
* **Weapon & Projectile Damage Processing:**&#x20;
  * Handles incoming melee and projectile attacks, applying damage effects accordingly.
* **Unarmed Combat**
  * Uses socket-based tracing for unarmed combat.
* **Notify Related Properties**
  * Manages defensive properties such as [**Hyper Armor**](/animation-notifies/defensive/hyper-armor-notify) **&** [**Invincibility**](/animation-notifies/defensive/invincibility-frame-notify) which can be toggled through notifies.
* **World Healthbar Updates**
  * Updates the world UI, displaying AI health changes in real-time, Souls style.
* **Death Handling**
  * Initiates the AI death sequence, plays the ragdoll/directional death animation and stops AI controller logic.

### Example Usage

<figure><img src="/files/7lRFLNW1fMtHU5RYw7sq" alt=""><figcaption></figcaption></figure>


# AI Boss Manager

<div align="left"><figure><img src="/files/Pxb9F1D6r6SRb7Q5t5rd" alt=""><figcaption></figcaption></figure></div>

The **AI Boss Manager (AC\_AI\_Boss)** component is designed for handling advanced boss behavior, allowing for dynamic phase transitions based on various conditions, such as health thresholds or custom triggers. It extends upon the standard [**AI Combat Manager**](/components-managers/ai-only-components/ai-combat-manager), overriding its **Ability system** to support **phase-based Ability sets**, cinematic transitions, and boss-specific mechanics. This ensures that boss encounters feel more engaging and responsive to the player's actions.

It is added to the **Soulslike Boss (B\_Soulslike\_Boss)** class by default.

### **How It Works**

* **Phase Management**
  * The component listens for **stat updates** and evaluates whether a phase transition should be triggered based on a predefined condition (e.g., health dropping below a threshold).
  * If a phase transition is required, it sets the new phase and updates the boss’s ability set accordingly.
  * It supports playing a **cinematic sequence, music, or an animation montage** before resuming combat.
* **Event Bindings & Damage Handling**
  * It binds to **OnStatUpdated** events to track changes in stats that may trigger a phase change.
  * Additionally, it listens for **OnDeath**, ensuring that once a boss is defeated, necessary actions such as **unlocking doors**, **playing a final death cinematic**, or **displaying a "Boss Defeated" message** are executed.
* **Ability Overrides**
  * Dynamically **overrides abilities** at each phase, replacing the boss's current ability set with a new one appropriate for the given phase.
  * This allows bosses to change their combat behavior as the fight progresses, introducing **new mechanics, attack patterns, or defensive maneuvers**.
* **Death Handling**
  * Upon death, it marks the fight as inactive and attempts to **play a death sequence**.
  * If applicable, nearby **boss doors** will be unlocked.
  * A **delayed screen message** (e.g, "Boss Defeated") can be displayed after a configurable delay.

### Example Usage

<figure><img src="/files/GeBGDZz8JYOJXKTSwVgl" alt=""><figcaption></figcaption></figure>

{% embed url="<https://youtu.be/X4sAa8LQ6KU>" %}


# Using Motion Warping

**Soulslike Framework** does not come with Motion Warping by default. However, it is very easy to enable it and get it going on your project.

Start by enabling the **Motion Warping** plugin:

<figure><img src="/files/LtFsMcO679ea2flVzQtq" alt=""><figcaption></figcaption></figure>

Head inside the **Soulslike Enemy (B\_Soulslike\_Enemy)** class and add a **Motion Warping** component:

<figure><img src="/files/0NnH1Dh1eFPURHzmRMTU" alt=""><figcaption></figcaption></figure>

Next, in the event graph, find the **Event PerformAbility** method. Adjust it like so:

<figure><img src="/files/rbSAfG1VDFIaPUYI4x4t" alt=""><figcaption></figcaption></figure>

That's basically it! Now the warp target will be updated/cleared when the **Enemy** is executing an attack. The final step is to use the plugin provided **MotionWarping Notify State** in the enemy's montages:

<figure><img src="/files/9iYmKjTeXJS1kNdaTrpg" alt=""><figcaption></figcaption></figure>

{% hint style="danger" %}
For Motion Warping to work, your animation sequence must have **Root Motion enabled.**
{% endhint %}

You can follow the same logic and implement it for the player as well.

1. Add the Motion Warping component.
2. Adjust methods where an attack montage is being played so it updates/clears the warp target.
3. Use the Motion Warping notify.


# Custom Saving/Loading

It is quite easy to expand upon the existing save/load system, thanks to our [Save & Load Manager](/components-managers/player-specific-components/save-load-manager) and the power of **Instanced Structs!**

Lets demonstrate this with a few examples.

### Example 1.0 - Saving a Custom Property

For this example, we're going to add a new variable to our **Character** blueprint **(B\_Soulslike\_Character).** You can also add it to any component you want.

<figure><img src="/files/wnphjcoBz1JZNEw0tmCz" alt=""><figcaption></figcaption></figure>

Next, we'll add some example events to alter/view its value:

<figure><img src="/files/uBlmQd7MgTmvAtGz5gAf" alt=""><figcaption></figcaption></figure>

<figure><img src="/files/rjdOzYyu3bbOCd6bI1hI" alt=""><figcaption></figcaption></figure>

Now to save this variable, all we need to do is trigger the **RequestAddToSaveData()** message in our **Player Controller (PC\_SoulslikeFramework):**

<figure><img src="/files/FgJw53cScIXaSeaNPkLN" alt=""><figcaption></figcaption></figure>

This message has 2 inputs. It might look a bit overwhelming at hindsight. However it provides a great amount of modularity when it gets to saving/loading data:

1. **Save Tag (Gameplay Tag):** Tag used for tracking save entry. Can be used to find data by tag and/or update/remove save entry data.
2. **Data\[] (Instanced Struct):** The actual data that is going to be saved/loaded.

In our case, we'll create an array which contains a single element - the value of our new property "MyVariable". This will update our save data and trigger an autosave whenever we change this value. We should also make the saving part a custom event if we want to call it from anywhere else.

Finally, there are 2 methods in [AC\_SaveLoadManager ](/components-managers/player-specific-components/save-load-manager)that we need to adjust:

1. **SerializeDataForSaving():** Serializes a specific data by tag and adds it to the final save data.

<figure><img src="/files/Eg4Qf2AEjvPIjJyNCzoS" alt=""><figcaption><p>Rough example - the cast can be avoided.</p></figcaption></figure>

2. **SerializeAllDataForSaving():** Serializes all possible data and sets it to the final save data.

<figure><img src="/files/AfMbBqIExLgWc1lU5GV4" alt=""><figcaption><p>Rough example - the cast can be avoided.</p></figcaption></figure>

You're all set! Now our new property will get saved whenever it's value has changed. Additionally, it will also get saved whenever we bulk-save data (specifically on quits/crashes etc).

<figure><img src="/files/0IG8kOX6Eatws4KQ3yg6" alt=""><figcaption></figcaption></figure>

{% hint style="success" %}
The reason it takes a few extra steps to save a simple property in Soulslike Framework is due to the save system being designed for handling more complex sorts of data.

You can always check out the existing saving/loading functionality for more information.
{% endhint %}

### Example 1.1 - Loading our Custom Property

Loading the saved data is as easy as this:

<figure><img src="/files/AvhBhO9dHmcTppolHTsZ" alt=""><figcaption></figcaption></figure>

<figure><img src="/files/fq1tgfBdrMGBvwXFL3j2" alt=""><figcaption><p>The decimal difference is related to formatting.</p></figcaption></figure>

### Example 2.0 - Saving Custom Actor(s)

For this example, we're going to create an actor which adjusts its scale when player overlaps its trigger. Then we'll save its "overlapped" state and new scale.

Lets start by creating a new actor and setting it up accordingly:

<figure><img src="/files/TmDkdRvCXC7eZrNVRJ3K" alt=""><figcaption></figcaption></figure>

<figure><img src="/files/FbOlmzPy99My5Ypq0N1X" alt=""><figcaption></figcaption></figure>

<figure><img src="/files/hLinq7bslLQ2cVatIxae" alt=""><figcaption></figcaption></figure>

Next, we'll need a new **Struct** to keep track of the 3 properties this actor has:

1. **Id (GUID):** the unique identifier of the actor (important)
2. **Scale (Vector):** the 3d scale of the actor
3. **HasBeenOverlapped (Bool):** the state of the actor

<figure><img src="/files/rPfu86aasAKc9gccnDRZ" alt=""><figcaption></figcaption></figure>

And now, when the timeline for scaling up is finished, we can request to update the save data with the new entry:

<figure><img src="/files/WWDh88URBWC5WVqgYvxz" alt=""><figcaption></figcaption></figure>

Finally, ensure that the actor instance you want to save in your world/level has a valid GUID:

<figure><img src="/files/KU9rwuyeyuqSxVF1GdMQ" alt=""><figcaption></figcaption></figure>

That's it! Now we're saving this actor.

### Example 2.1 - Loading our Custom Actor(s)

To load, we just need to adjust our Event BeginPlay slightly and bind to [AC\_SaveLoadManager](/components-managers/player-specific-components/save-load-manager)'s **OnDataLoaded()** delegate:

<figure><img src="/files/KfGYw5JU94NpRbo20Ntx" alt=""><figcaption></figcaption></figure>

That's basically it. Now when you play, you'll notice that this actor now saves its properties!

<figure><img src="/files/vnULr5VrQfDGddyjmrbx" alt=""><figcaption></figcaption></figure>


# Adding New Settings

The Settings menu uses **a single generic widget** for all entries: **W\_Settings\_Entry**. This widget has the capability of supporting 4 different settings:

1. Single Button Entry

<figure><img src="/files/PwSRfifDlZ90QLEpe3T0" alt=""><figcaption></figcaption></figure>

2. Double Button Entry (Increase/Decrease)

<figure><img src="/files/9KeuBjiuDfDipcyeyLZm" alt=""><figcaption></figcaption></figure>

3. Drop-down Entry

<figure><img src="/files/1shxkoIUr0boVh1dxnb0" alt=""><figcaption></figcaption></figure>

4. Slider Entry

<figure><img src="/files/Qt8zKQGQAYBJDg1wOU8N" alt=""><figcaption></figcaption></figure>

### Adding a New Setting from Game User Settings

We will use the **Double Button** style to create a new setting entry for **toggling on/off VSync**.

Start by heading into the generic setting entry widget: **W\_Settings\_Entry:**

<figure><img src="/files/yhgkFgklaktWybgln12z" alt=""><figcaption></figcaption></figure>

Go into the Event Graph and head inside the collapsed Initialization graph:

<figure><img src="/files/6Do3sQL16CwUVtv93haK" alt=""><figcaption></figcaption></figure>

Add a new tag for your setting. For this example, I've added **SoulslikeFramework.Settings.VSync**:

<figure><img src="/files/HWlhtTik6OpFKm10fjjt" alt=""><figcaption></figcaption></figure>

Now, we'll set the entry type to **Double Button** and ensure that the new setting is retrieved from the **GameUserSettings**:

<figure><img src="/files/Fr0LiutFLdyBDblAmvmD" alt=""><figcaption></figcaption></figure>

Go back into the Event Graph and go into the **Double Button Settings** node:

<figure><img src="/files/iafJ6yR7yz4PbuCpvVcK" alt=""><figcaption></figcaption></figure>

Add your new setting tag to the Switch node:

<figure><img src="/files/EGu95k947KkNIlxQwLM8" alt=""><figcaption></figcaption></figure>

Then, when the increase button is pressed, we want to basically toggle the setting on/off. We can achieve this like so:

<figure><img src="/files/TzyQ5J1gbagnIAskcMJa" alt=""><figcaption></figcaption></figure>

Do not forget to the same process for the decrease button.

Next, we want to add a new entry to our Settings widget. Head into **W\_Settings.** Add a new **W\_Settings\_Entry** widget to the vertical box:

<figure><img src="/files/6jgHXpb3TlMc8HAbwvSb" alt=""><figcaption></figcaption></figure>

Finally, ensure that you select the correct tag for your setting and customize the display name/description for your new entry:

<figure><img src="/files/pfHu7Lcb0o1M44WdJxA9" alt=""><figcaption></figcaption></figure>

### Adding a New Custom Setting

We will yet again use the **Double Button** style to create a new setting entry for **toggling on/off Blood**.

First of all, lets begin by adding a new flag for Blood in our custom game settings asset. Head inside **PDA\_CustomSettings**, and add a new boolean. Ensure that it's **default value** is set to be **True:**

<figure><img src="/files/iBOu8TFAUtV7L64M9FBk" alt=""><figcaption></figcaption></figure>

The custom game settings asset is stored in the **Game Instance** so it can easily be accessed from any class at any time.

Now, we'll need to adjust logic where blood effects are being applied. Lets start with **AC\_CombatManager.** Adjust all of the methods that spawn blood effects following this logic:

<figure><img src="/files/fM2asbWE5GkGzLkDnfeb" alt=""><figcaption></figcaption></figure>

Similarly, adjust methods in **AC\_AI\_CombatManager** for the effects on enemies.

{% hint style="danger" %}
This approach is quite simple and will disable all "hit" visual effects, even if they're not blood related. To determine if a hit effect is blood, you will need to implement your own custom logic.
{% endhint %}

Now, head inside **W\_Settings\_Entry** and into the collapsed Initialization graph. Add a new tag for your setting (**SoulslikeFramework.Settings.Custom.Blood** in our example):

<figure><img src="/files/C9lhJTsfq7auh7ZHdrcC" alt=""><figcaption></figcaption></figure>

Initialize the setting entry from our **CustomSettings** asset:

<figure><img src="/files/upQuU8AhM3U1YxVPViRf" alt=""><figcaption></figcaption></figure>

Next, head into the **Double Button Settings** collapsed graph. Add the new tag to both of the switches.

Ensure that you toggle our new boolean when increase/decrease buttons have been pressed:

<figure><img src="/files/GGZlkJ3DDUueLSkOMF5z" alt=""><figcaption></figcaption></figure>

Finally, lets add a new entry to our **W\_Settings** widget. You can easily duplicate elements under the **CategorySwitcher** to add/remove categories.&#x20;

<figure><img src="/files/3IzwaihzLwoq2fTRYWEa" alt=""><figcaption></figcaption></figure>

For example, we'll place this new setting in the Gameplay Settings category which is not utilized by default.

<figure><img src="/files/fvUY47u2NbvMrqHc4QxV" alt=""><figcaption></figcaption></figure>

Since we've adjusted the index count of our **CategorySwitcher**, we need to ensure that each category has a correct index assigned:

<figure><img src="/files/xrJxUZ0kPhIx145m4h2O" alt=""><figcaption></figcaption></figure>

<figure><img src="/files/vGnqmrFLPh4Kz2FmVv1A" alt=""><figcaption></figcaption></figure>

That's it! Now we should have our setting on a new category that we've started utilizing:

<figure><img src="/files/ImZBpXMWFc6uJlUiJypH" alt=""><figcaption></figcaption></figure>

Now if we disable blood, you'll notice no effect is played upon dealing/taking damage!

<figure><img src="/files/CRWA8l67nNosEG12WaEY" alt=""><figcaption></figcaption></figure>


# Extending Weapon Animsets

### 1. Extending the Primary Animset Asset

Open the **PDA\_WeaponAnimset** primary data asset. Add a new property of type **Anim Montage (Soft Reference).** Connect it to **Event SetupAnimData:**

<figure><img src="/files/3A8AOCWUykne1qKYDIsd" alt=""><figcaption><p>The event is used <strong>ONLY</strong> for the Utility editor tool <strong>EUW_WeaponAnimsetCreator</strong></p></figcaption></figure>

### 2. Adjusting the Soulslike Weapon Animset Creator Utility Tool

Head inside **EUW\_WeaponAnimsetCreator located in /SoulslikeFramework/\_Utility/Creators.** Promote the new pin that we've created inside the **primary asset** into a variable:

<figure><img src="/files/h4OjDr65aVh5wR6FXQaP" alt=""><figcaption></figcaption></figure>

Add a new **Single Property View** component to the vertical box inside the Editor Utility Widget. Give it an appropriate name, and fill in the **Property Name** field with the new variable we've created inside **EUW\_WeaponAnimsetCreator:**

<figure><img src="/files/KlkI8V2tO9kKFMVkho9R" alt=""><figcaption></figcaption></figure>

Finally, ensure that this new **Single Property View** is initialized on **Event PreConstruct**:

<figure><img src="/files/UntWrdgJo8pb2mLZx3Yi" alt=""><figcaption></figcaption></figure>

### 3. Creating the Relevant Montage

Create your montage. Ensure that is a **Root Motion** animation (highly preferred for combat):

<figure><img src="/files/qFBWKagHPWrHitqShhL0" alt=""><figcaption></figcaption></figure>

You can [refer to this category for more information related to creating montages/using notifies.](/getting-started/quickstart/setup-custom-montages)

### 4. Creating the Relevant Action

Create your action. This is a simple example for a **Sprint Attack** action:

<figure><img src="/files/3xxSHYIpmdl9fASDRqjp" alt=""><figcaption></figcaption></figure>

<figure><img src="/files/An1KT3nLPAM76xrAUhnO" alt=""><figcaption></figcaption></figure>

You can [refer to this category for more information on creating Actions.](/workflow/editor)

### 5. Using the new Action

Adjust the logic where you want to implement the new attack. For e.g, if we want our **Sprint Attack** to work with the *Right hand light attack,* we can adjust the event for **IA\_RightHandAttack** (inside B\_Soulslike\_Character) and add a simple condition like this:

<figure><img src="/files/YCb0ODa1Gzi1ETJB22R1" alt=""><figcaption></figcaption></figure>


# Weapon Specific Impact Sounds

Soulslike Framework comes with an example sound handling system that is tied to the combat. [Player's Combat Manager](/components-managers/player-specific-components/combat-manager) & the [AI's Combat Manager](/components-managers/ai-only-components/ai-combat-manager) are responsible for handling the sounds.&#x20;

However, for some projects, this might be limiting. In this page, we will look at how we can extend this system.

### Weapon Specific Impact Sounds

Start by adding a new property of type **SoundBase** to the **Base Weapon Actor (B\_Item\_Weapon):**

<figure><img src="/files/P2OICAQ5tMvuFYC7O6db" alt=""><figcaption></figcaption></figure>

Now, head into **AC\_CombatManager** and find the **HandleIncomingWeaponDamage** method. We'll add a new input for our new sound property:

<figure><img src="/files/ACpzvGFw1czaD5r18PvQ" alt=""><figcaption></figcaption></figure>

Let's ensure that we pass this new property we created to this method inside the **Base AI Weapon class (B\_Item\_AI\_Weapon):**

<figure><img src="/files/oMhqZSYOrdkzzTSCVyEh" alt=""><figcaption></figcaption></figure>

Back in **AC\_CombatManager,** lets adjust the main method for handling incoming weapon damage (this is where the passed sounds are being played):

1. Adjust the sound logic that is triggered when player's Stance is broken:

<figure><img src="/files/fqzjmKT8RPCyCyNHBg3W" alt=""><figcaption></figcaption></figure>

2. Adjust the sound logic that is triggered if player is not guarding:

<figure><img src="/files/QnpuKKNy97HXMf1WW7ua" alt=""><figcaption></figcaption></figure>

That's it! Now, you can give each AI weapon actor its own **impact** sound:

<figure><img src="/files/npxQuMrTY6kc5bbgKczD" alt=""><figcaption></figcaption></figure>

{% hint style="success" %}
You can adjust the similar methods in **AC\_AI\_CombatManager** to also make player weapons' impact sounds specific to each weapon.
{% endhint %}

### Unarmed Impact Sounds

#### AI Dealing Unarmed Damage to Player:&#x20;

Head inside **AC\_AI\_CombatManager** component and create new properties for:

1. Unarmed Impact Sound
2. Unarmed Guard Sound (when unarmed attack has been guarded by player)
3. Unarmed Perfect Guard Sound (when unarmed attack has been perfect-guarded by player)

Then adjust the **ApplyFistDamage** method:

<figure><img src="/files/VQw8tYrE7H1SVeXvWqih" alt=""><figcaption></figcaption></figure>

#### Player Dealing Unarmed Damage to AI:

Head into the **AC\_AI\_CombatManager** component and into the **HandleIncomingWeaponDamage\_AI** method. Add a new input pin of type **SoundBase:**

<figure><img src="/files/HQwV8WWyCFpUFfDgiYx4" alt=""><figcaption></figcaption></figure>

Adjust the sound logic in the method to utilize this new pin we added:

<figure><img src="/files/MWNWdNwsNoTpDTMePvq5" alt=""><figcaption></figcaption></figure>

Then, create a new property inside **AC\_CombatManager** for the unarmed impact sound. Head inside the **ApplyFistDamage** method and utilize this new property:

<figure><img src="/files/J0oX9YbpdFJzHQ4UzMRk" alt=""><figcaption></figcaption></figure>


# Resetting Enemies After Resting

In Soulslike Framework, there isn't specific functionality for "resetting" enemies after resting. However, it is not difficult to implement such logic. In this page, we'll go over this briefly.

### Building a Simple Resetting Logic for Enemies

Head into the **Soulslike Enemy (B\_Soulslike\_Enemy)** class, which is the parent for all enemies. Go into the **"INITIALIZATION"** collapsed graph. Here, we will cache some transform data:

<figure><img src="/files/qoe5Lw4G0vkNemg1lOcA" alt=""><figcaption></figcaption></figure>

Next, lets begin building an event which will be responsible for resetting Enemy data. Create a new event and name it as you like. You will notice that *you do not have some of the methods used* in this event below:&#x20;

<figure><img src="/files/sjKAzLpYyEFyflTLJX2X" alt=""><figcaption></figcaption></figure>

Now, we'll create those missing methods that will help us reset the enemy data. Head into **AC\_AI\_CombatManager** and go into the **"DEATH HANDLING"** collapsed graph. Create a new event **"Event ResetDeath"** and connect it like this to the Do Once node:

<figure><img src="/files/BaSjbDT2yDwqAb3HhaS6" alt=""><figcaption></figcaption></figure>

Next, head into **AC\_AI\_BehaviorManager** and add a new event **"Event Reinitialize"** to actually reinitialize the behavior component:

<figure><img src="/files/2C4x65GDdb4clE1vOW7q" alt=""><figcaption></figcaption></figure>

That's it! Now you will be able to fully build the **Event ResetEnemies.** Now, we must ensure that we call this new event we've created when we are resting. To do this, head into the **AC\_InteractionManager** component and go into the **"RESTING" collapsed graph.** Create a new event which will trigger resetting for all actors of type **Soulslike Enemy:**

<figure><img src="/files/X3SWT94pyoc6iQupjBqG" alt=""><figcaption></figcaption></figure>

Call this new event wherever you like. For this example, I will call it when we're leaving/exiting resting mode:

<figure><img src="/files/u75r4IdxD2VmmPvaA78N" alt=""><figcaption></figcaption></figure>

Finally, we'll fix an issue inside **BTT\_GetStrafePoint** which causes some null reference errors upon resetting the enemy. Head into the task blueprint and adjust the **"SetStrafeLocations"** method:

<figure><img src="/files/1LepM7hXWCQe60DdTG39" alt=""><figcaption></figcaption></figure>

Result:

<figure><img src="/files/lPlEqGKbVDMZNz47wTqA" alt=""><figcaption></figcaption></figure>